How to Use Facebook Ads Manager to Create Custom Reports
Recent Posts
Why More Businesses Are Embracing External IT Support How to Market Essay Help to High Schoolers Agorapulse Vs. ContentStudio Metricool Vs. FeedHive SocialBee Vs. Vista Social Vista Social Vs. SocialBee SocialBee Vs. Zoho Social Zoho Social Vs. SocialBee Vista Social Vs. Zoho Social Zoho Social Vs. Vista Social SocialBee Vs. Agorapulse Agorapulse Vs. SocialBee Vista Social Vs. Agorapulse Agorapulse Vs. Vista Social Zoho Social Vs. Agorapulse Agorapulse Vs. Zoho Social SocialBee Vs. ContentStudio ContentStudio Vs. SocialBee Vista Social Vs. ContentStudio ContentStudio Vs. Vista Social Zoho Social Vs. ContentStudio ContentStudio Vs. Zoho Social ContentStudio Vs. Agorapulse SocialBee Vs. Metricool Metricool Vs. SocialBee Vista Social Vs. Metricool Metricool Vs. Vista Social Zoho Social Vs. Metricool Metricool Vs. Zoho Social Agorapulse Vs. Metricool Metricool Vs. Agorapulse ContentStudio Vs. Metricool Metricool Vs. ContentStudio SocialBee Vs. SocialPilot SocialPilot Vs. SocialBee Vista Social Vs. SocialPilot SocialPilot Vs. Vista Social Zoho Social Vs. SocialPilot SocialPilot Vs. Zoho Social Agorapulse Vs. SocialPilot SocialPilot Vs. Agorapulse ContentStudio Vs. SocialPilot SocialPilot Vs. ContentStudio Metricool Vs. SocialPilot SocialPilot Vs. Metricool SocialBee Vs. Buffer Buffer Vs. SocialBee Vista Social Vs. Buffer Buffer Vs. Vista Social Zoho Social Vs. Buffer Buffer Vs. Zoho Social Agorapulse Vs. Buffer Buffer Vs. Agorapulse ContentStudio Vs. Buffer Buffer Vs. ContentStudio Metricool Vs. Buffer Buffer Vs. Metricool SocialPilot Vs. Buffer Buffer Vs. SocialPilot SocialBee Vs. FeedHive FeedHive Vs. SocialBee Vista Social Vs. FeedHive FeedHive Vs. Vista Social Zoho Social Vs. FeedHive FeedHive Vs. Zoho Social Agorapulse Vs. FeedHive FeedHive Vs. Agorapulse ContentStudio Vs. FeedHive FeedHive Vs. ContentStudio FeedHive Vs. Metricool SocialPilot Vs. FeedHive FeedHive Vs. SocialPilot Buffer Vs. FeedHive FeedHive Vs. Buffer SocialBee Vs. Publer Publer Vs. SocialBee Vista Social Vs. Publer Publer Vs. Vista Social Zoho Social Vs. Publer Publer Vs. Zoho Social Agorapulse Vs. Publer Publer Vs. Agorapulse ContentStudio Vs. Publer Publer Vs. ContentStudio Metricool Vs. Publer Publer Vs. Metricool SocialPilot Vs. Publer Publer Vs. SocialPilot Buffer Vs. Publer Publer Vs. Buffer FeedHive Vs. Publer Publer Vs. FeedHive SocialBee Alternative SocialBee Review Vista Social Alternative Vista Social Review Zoho Social Alternative Zoho Social Review Metricool Alternative Metricool Review SocialPilot Alternative SocialPilot Review Why Free-to-Play Models Are Fueling the iGaming Boom FeedHive Alternative FeedHive Review Publer Alternative Publer Review How Delivery Dispatch Software Reduces Late Deliveries Digital Signage Players That Deliver Reliable Performance Sweepstakes Synergy: Combining Creativity and Strategy for Maximum Impact Scalenut Vs Surfer Seo Neuron Writer Vs Surfer Seo Surfer Seo Vs Frase Frase Vs Clearscope Clearscope Vs Surfer Seo Surfer Seo Vs Clearscope Surfer Seo Vs Ahrefs Byword Ai Review Best Shopify Seo Apps Fake News Generator Ai Paragraph Generator Finding The Top Long Island Marketing Companies How to Get Verified on Instagram How Do I Calculate Shipping Costs? How Do I Start a Dropshipping Business? Hiring A Marketing Company Can Change Your Business Outlook! Confirmed: Google To Stop Showing Ads On Right Side Of Desktop Search Results Worldwide How Do You Do Facebook Marketing? Benefits Of Marketing With Facebook Facebook Marketing Is A Winner How to Install the Facebook Pixel In Wordpress Key to Creating Loyal Customers How To Market Infographics How To Use Social Proof To Sell More Products Online (E-Commerce) How To Sell Using Fear The Fundamental Goal of Facebook Marketing How To Use Facebook Ads Effectively How is Artificial Intelligence Changing E-Commerce Advertisement Space? 5 Best + Free Facebook Marketing Books How To Make A GIF For Facebook Ads Increasing Benefits of Link-less Brand Mentions Smart Marketing Strategies for Small Businesses Vicious Traps of Offshore Freelancing 4 Easy Steps To Acquire Competitor’s Backlinks on Your Site When and How to Rebrand Your Existing Video B2B SEO Customer Engagement Strategies Using Instagram To Generate Ecommerce Sales - What Smart Marketers Do The Dos And Don’ts Of Facebook Marketing For Real Estate Agents Five Companies Changing the Game of Advertising Advertising Trends to Pay Attention To 5 Best Shopping Cart Software to start an eCommerce Business Digital Marketing Strategies That Are Still Ignored By Experts How to Choose the Right Hardware for Your EPOS System Content Marketing Tactics Small Business Problems Automation Strategies for Improving Cash Flow How SEO and Facebook Ads Work Together How To Get More App Installs How To Write A Business Plan For Your Marketing Business Facebook Advertising Tools to Amplify Your ROI Creating Ephemeral Content: Utilizing FOMO in Marketing Crucial Tips If You Want to Start Using SEO for Your Business Digital Marketing Tools Facebook Post Types You Should Be Using Avoid These 6 Common Facebook Marketing Mistakes Ways You Can Take Advantage of Instagram Story for Business Small Business Guide To Winning SEO Tactics Engage, Inspire and Convert With Personality Quizzes Easy Steps to Create a Proven Facebook Marketing Campaign 7 Powerful Social Media Benchmarking Strategies You Need to Implement Best Strategies To Increase Mobile App Engagement Why A Digital Marketing Strategy Is Important? Facebook + Email Funnels: The Perfect One-Two Combo For Growth Hacking Why Facebook Is Still Number One For Social Media Marketing Google Medic Broad Core Update Key Points to Know The Importance of Data Visualization in eCommerce Marketing Strategies Social Hacks - Influence, Persuade and Beyond A Complete SEO Checklist for Website Owners 7 Ways to Boost Your Small Business Marketing The Anatomy of a Good Website: 5 Key Qualities Your Site Should Have Building a Thriving Email List with Facebook Ads in 5 Steps 10 Facebook Ads Hacks That Work How to Use SEO to Boost your Brand Value Why you need to Change your SEO Strategy In 2018 Pocket-friendly Link Building Tactics That Provide Good Returns In Content Marketing Hobbies Matter: How Side Projects Are Making You More Productive Six Essential Link Building Tactics for Ecommerce Businesses How to Generate Potential Customers from Facebook for Your E-Commerce Business Teasers and Trailers Are the Highest Converting Tools! Here’s Why Top Reasons To Hire An SEO Agency For Your Business Marketing How to Target the Right Market for Your SEO Agency B2B Digital Marketing Essentials Do you want to know the pathways to amplify the presence of a social account? Share More Or Less? Know The Right Frequency Of Posting On Social Media Platforms Compare and contrast ASINspector and keyword inspector for SEO marketing How To Build Brand Awareness Using Instagram Reasons Why 2018 Is The Best Year To Start An E-commerce Company 6 Tips to Choose Domain Names That Are SEO Friendly Facebook Content Marketing Strategy Tips for eCommerce Technology Skills That Are Becoming Predominant in Marketing Field The Ultimate Guide to Leveraging Facebook Ads Instagram Features: Complete List For The Marketing Experts Five Upcoming Email Marketing Tips Every Digital Marketer Should Know How Working With Influencers Can Help Your Facebook Ads What Is The Difference Between Customer Support And Customer Service? Quick Guide to Making Great Video Ads For Holidays How to Use Facebook Ads to Distribute Your Content How Can Leadership Be Developed? 9 Perfect Ways Conversion Rate Optimization in 2018: 10 Poisonous Myths How To Plan and Recover from A Penalized Website? A Wonderful Way To Get More Traffic On Your Brand’s Website Are You Doing Enough To Collect Data From Your Live Event Attendees? The Importance of Using The services of A White Label SEO Agency 7 Tips on Having a Productive Morning as a Marketer What Is The Best Way To Learn SEO Course? Podcasts: A Fountainhead of Knowledge and A Marketing Tool For Small-Scale Businesses 4 Ways to Increase Web Page Speed 8 Tips for a Winning Social Media Marketing Resume Ways To Unlock Startup’s Productivity And Avoid Falling Into Debt How to Improve Your Link Building Outreach Pipeline Reasons to Use Python for Marketers Secrets to Making it Big With a Subscription Box Business Why You Need To Select A Quality Service Provider For Website Optimization UX or UI: Which Career Option To Choose Internet Marketing Is Only Growing: Is Your Business Ready? Marketing Strategies To Sell Your Products Online How Blockchain Is Creating a Future for Digital Marketing Critical Facts About Google Search Console Unveiled Generate Relevant SEO Analysis and Reports – Top 7 Rules to Follow Content optimization for voice search – listen to what Google has to say about it Using videos effectively for each stage of the buyer's journey Why HR Managers Must Use An Employee Management System in an Organization Want to improve your SEO ranking? Top Five Useful Steps to Follow How You Can Promote Your Business Through Instagram Attracting Shoppers to Your New Online Store Use Instagram Marketing To Get Great Benefits Proven Tactics for Selecting Website Names Increase Your Sales and Conversions Through Instagram New And Effective Features Of Instagarm Make Social Media A Better Place The Types of Funding That Can Help Your Start-up Business IGTV – Everything you need to know 4 Revealed Reasons Why You Really Need A Website For Your Struggling Business 5 Major Benefits of Hiring an SEO Agency How to Get Listed on Crypto Exchanges Ultimate Guide to Creating a Successful Instagram Video Marketing Strategy How to Manage a Distributed Marketing Team Why is Black Friday footfall in decline? How Can You Build A Video Sharing Website of your own? The Perfect Name For Your Business Is Out There—Here’s How You Can Discover It Your Guide To Creating Marketing Videos That Work Why Small Business Owners Should Engage in PR? 5 Important Elements of Good UX in 2023 (And Beyond) Why designers must pay more attention to functionalities over aesthetics when creating business websites How to Turn Online Reviews into Powerful PR Tools 2 Feasible Ways Entrepreneurs Can Use Their Marketing Development Funds SEO core concepts every entrepreneur needs to know 5 Essential SEO Tools That Every Renowned SEO Professional Uses Things To Avoid While Choosing an SEO Firm Benefits of Multi-Level Marketing: Why you Should Make this your Next Business Move Advanced Methodology for Competitive Analysis for Local SEO 7 Useful Grammar and Proofreading Tools for Content Marketers How to Use Instagram Stories: 6 Tips for Promoting Your eCommerce Brand Practical Tips for Successful Facebook Ads Scaling LinkedIn Ads vs Facebook Ads: Which is better for B2B Marketing How a customer-centric service is the best way to market in a digital world GUIDELINES TO DEVELOP A SUCCESSFUL DIGITAL BUSINESS PLATFORM Customer Acquisition Cost (CAC): The Ultimate Guide Pay-Per-Click for Franchises: 4 Quick Tips for a Better ROI How to Choose the Perfect Facebook Video Ad Format How Analysts May Help Digital Marketing Department in Blockchain 10 Useful Grammar and Proofreading Checkers for Content Makers 10 Best Productivity Tools for Your Marketing Team SEO and Animated Videos- A Great Combo to Succeed 8 Common Facebook Lead Generation Mistakes and How to Avoid Them Ideas to Protect a Storage Unit from Moisture 5 Tips to Create High-Performing Facebook Ads for SaaS startups B2B Facebook Advertising Facebook App Install Ads [UPDATED] Facebook Retargeting Ads 10 Best Ways Of Developing A Content Marketing Strategy That Boosts Your SEO Ultimate Ecommerce Website Builder for Small Businesses It is time to remove some SEO techniques: Find out here Essential Things You Need To Know About Web Hosting How to Optimize Your Website for Voice Search Google Data Studio Help Guide - Quick Points to get the best out of it Essential Benefits Of Custom Software Solutions For The Growth Of Your Business Why Online Ad Targeting Can Work, But Don’t Be Creepy The Six Crucial Elements in an SEO Audit Create Appealing Video Animation with Pro Animation Software Dos and Don'ts of Launching Promotional Giveaway Campaigns on Social Media 193 Best Facebook Ad Examples [2023] [UPDATED] 8 SEO and Marketing Trends to Watch Out For Choosing A Creative Agency Instagram Ad Costs Instagram Ad Examples Instagram Ad Specs And Sizing 2024 Successful Marketing Career: 6 Essential Tips to Have in Your Resume Facebook Ad Templates [2023] [UPDATED] What are the benefits which are associated with Online Testing Tools? Testing Checklist: How to Test a Mobile App Why Affiliate Marketing Is Important? Ultimate Resource for Work at Home Professionals Facebook Ad Design Facebook Video Ad Examples Methods to Set up Multiple Facebook Accounts Content Marketing ROI: What & How To Measure Content Performance Social Media Engagement Tactics You Should Try The Importance Of Copyright For Businesses Best Email Subject Lines Best Facebook Ads Courses Growth Hacking Books Instagram Sponsored Posts Best Call to Action Examples (for More Conversions) User Journey Map: The Ultimate Online Guide What Are The Differences Between SEO (Organic Search) and Pay Per Click? The Ultimate Guide to Create a Multilingual WordPress Site Which Things To Be Focused In SEO? 4 Ways to Overcome Facebook Ad Fatigue and Attract More Conversions 4 Perks Of Combining Digital And Traditional Marketing Know These Actionable Affiliate Marketing Tips for Better Profits How to Decide Which Social Platform is Right for Your Paid Content Promotion Simple ways to target your audience through Facebook campaigns Flyby: Selling $1M of Hangover Pills In 10 Months Why is DuckDuckGo not grabbing SEO attention? 9 Newswire Questions to ask Before Choosing Press Release Distribution Services Top 5 Shopify Product Customizer Apps Trade Shows & How the Start-Ups Should Be Prepared In Advance to Get the Best Outcome from Them 4 Crucial Tips For Real Estate Sales Success – Why Knowledge Matters 4 Best WordPress SEO Tips & Techniques to Boost Rankings What to Check in a Website Before Building Links? How a Mobile Tracker Helped Me Saved My Son’s Life? Ecommerce Email Marketing Guide: Generating More Sales Top SEO-Friendly WordPress Themes That Will Improve Your Site Rankings SEO Guide - Your Business Strategy for This Year 5 Tricks Every Woman Entrepreneur Should Use for Better Employee Retention 5 Tips to Increase Engagement Using Facebook Live Unlock the Potential of Gifting Industry with Web-to-Print Software How to Use Facebook to Market Your Business Why Users Uninstall Mobile Apps Liz Butts Interview Sprinkle Pop Benefits of Hiring A Digital Marketing Expert Boosting eCommerce UX Design to Reach Gen Z 5 Reasons Why Team Building Activities Are So Important 7 Strategies to Successfully Deploy Online Training How to Use Instagram Video Ads to Boost Your Business How to Use Facebook Ads Manager to Create Custom Reports 5 Tips To Increase Conversions Using Facebook Ad Images How A.I. Has Transformed The Business Communication Industry Different Career Options That You Can Choose in the Information Technology Industry Using Brand Storytelling On Social Media To Engage With Your Customers 10 Tips for Creating a Powerful Personal Brand Online The Most Significant Social Media Marketing Trends Michał Sedzielewski Interview - Voucherify Sean McElwee Interview Born this Way Claire Nichols Interview Kalix Health Your Essential eCommerce Website Audit Checklist Business Storytelling: 5 Tips to Engage Your Customers And Boost Ecommerce Sales Tips for Improving the Keyword Research and Boosting Sales and Traffic Actionable Tips to Maintain a Strong Brand Identity Yari Copt Interview Old Captain Co Mike Patrick Doherty Interview Understanding eCommerce Best Caching Plugins To Improve WordPress Speed Alexandra Riggs Interview Oobi Leah Ferrazzani Interview Semolina Artisanal Pasta Jordan Silver Interview Mondo Monster Wear It’s High Time: 6 Ideal AI Tools to Optimize Your Email Marketing Performance 7 Tips to Optimize Your Facebook Ad Campaigns Business Data Loss: Common Causes, Biggest Consequences, and Prevention Measures Ultimate Guide: What is Digital Marketing? Social Media Update Bulletin: LinkedIn's new interest targeting options for ad campaigns How to Block Words and Profanity From Your Facebook Page 7 Tips for Creating Your Best SEO Content A/B Testing Ad Blocking Advertising Network ALT Text Autoresponder Benchmarking Brand Awareness Brand Equity Brand Loyalty Buyer Persona Call-to-Action (CTA) Click-Through Rate (CTR) Competitive Analysis Conversion Rate Cost Per Click (CPC) Cost Per Impression (CPM) Demand Generation Display Ad Drip Campaign Email Marketing Unstable Prices: How Artificial Intelligence Predicts Retail Sales 5 Things You Need To Do Before Launching your E-commerce website Engagement Rate Facebook Analytics Facebook Marketing Funnel Velocity Instagram Ads Instagram Marketing Lead Generation Lead Nurturing Market Attribution Market Attribution Models What Does SEO Stand For? Top 3 Must-Know Tactics to Nurture Your Email List and Increase Your Conversions How to Effectively Convert Viewers into Consumers 9 Ways to Grow Your Twitter Following 3 Crucial Steps for Creating a Successful Website from Scratch Celeste Robertson Interview Natural Supply Co Andrus Purde Interview Outfunnel Marji Guyler-Alaniz Interview FarmHer Market Segmentation Marketing Dashboard Marketing Goals Marketing KPIs Marketing Opportunity Marketing Qualified Lead (MQL) Marketing Spend Marketing Vehicle Multi-Touch Attribution Niche Marketing Paid Marketing Proactive Marketing Real-Time Marketing Response Rate 5 Ways to Improve Your Digital Marketing Strategy Why You Should Set Up A Google Business Page Return on Investment (ROI) Sales Accepted Lead (SAL) Sales Cycle Sales Forecasting Sales Funnel Seach Engine Marketing (SEM) Search Engine Optimization (SEO) Share of Voice (SOV) Social Listening Top of Funnel Marketing Value Drivers Viral Marketing Web Analytics Ecommerce Marketing & Customer Experience: 15 Strategies Top Online Stores Are Using How to use cold outreach to generate B2B sales Why Your Business Needs a Referral Program All You Need to Know about the SEC Whistleblower Program Top Checklist for Starting Web Design Company Having a unique domain name will help your business to get more success 5 Tips to Effectively Measure the ROI of your Event Launching a Business Online – 5 Tips for the Debut How To Boost App Engagement And Retention - Key Tips Winning Social Media Marketing Trends That Work Facebook Direct Response Campaigns: Getting Customers to Act How to Increase Customer Lifetime Value And Boost Profits Voice Broadcasting Software & Best Practice Improving the Cybersecurity of Your Business How to Use Reddit in Your Marketing Strategy 6 reasons why marketers aren’t keen on leveraging content marketing Tips for Every Facebook Marketer 7 Benefits of Digital Marketing for Companies Hero Within - Tony B Kim Inteview 10 Creative Ways to Utilize Social Media Marketing at Trade Shows Planning an Effective B2B Content Marketing Strategy What to Expect from the Ecommerce World 6 Signs That Your Business Needs SEO Consultancy CartHook Review 8 Online Marketing Trends 5 Secrets in Promoting Your Product-Based Business on Facebook How Social Media Helps SEO 5 Solopreneur Struggles — and How to Solve Them Tips to create effective Customer Experience Strategies How to Increase Conversion Rate of E-commerce? 7 Ecommerce Website Design Mistakes That Are Costing You Conversions Never Make These Top 5 Facebook Marketing Mistakes Increase App Downloads App Store Screenshot Sizes (ASO Guideline) Mobile App Advertising Mobile App Marketing Mobile Marketing (Explained) Mobile User Acquisition Top Influencer Marketing Strategies for the Social Business 10 Effective Facebook Advertising Tips for Business Promotion Marvin Menke Interview Hemel Joeleen Interview Joeleen Torvick Jon Watson and Mary Spencer Interview The Metal Gardener Kelly Jansens Interview Green Dog Pet Accessories Creating an Online Marketing Plan that Will Help Any Business Grow How to Effectively Build Your Brand on Facebook Top 10 Do's and Don’ts in B2B Digital Marketing Buying a Property: How to Save Money for a House Current Upcoming Trending Features in App Development How to Grow Your Business Using SEO Advertising Strategies SaaS Marketing Plan SaaS Marketing Strategies Saas Pricing What is SaaS Marketing? Social Media Campaign Ideas for Boosting E-Commerce Sales What are drip campaigns and why you should use them 4 Strategies you can use to increase the ROI of your e-commerce website Best Time to Send Email Campaigns How to Build an Email List SaaS Pricing Strategies SaaS Psychology Pricing Strategies 7 Important Principles For Successful Email Marketing Instagram Marketing: The best Ideas, Strategies, and Tools one can look for SEO Tips to Increase Your Business' Online Traffic How to Write Facebook Ad Copy that Converts How to Create an Impactful Presence through Advertisement on Social Media Here are 6 Ideas to keep your Digital Marketing Clients longer 5 Differences Between Quality Assurance and Quality Control Zipify One Click Upsell Review How to Create a Slogan How to Drive Traffic to Your Website How to Retain Customers 55 Must-Use Newsletter Topics How To Apply Brand Consistency Into Your Website Design How Pinterest Helps Small Businesses Skyrocket Their Traffic and Revenue 10 Essential Elements for Successful Landing Pages The utmost prime guide for Marketing Videos Effective Lifecycle Email Marketing Tactics And Considerations How to Build a Landing Page How to Create a Sales Funnel How to Take Product Photos How to Write a Call to Action 5 Communication Tactics All Startups Need to Follow 11 Facebook Marketing Tips For Local Businesses 5 Tips to Make Attractive Facebook Company Page to Get More Likes How to Increase Productivity in a Digital Workplace Top Marketing Channels for eCommerce, the Best Ways to Drive Revenue How to Develop Entrepreneurial Skills That Really Matter Klaviyo Review 2023 Top Three Lookalike Mistakes Made by Small Business Owners 9 Secret Techniques To Improve Facebook Marketing for Wordpress Website How to Generate Leads How to Sell Online Courses Product Photography Product Videos for Marketing How To Promote A Mobile App On Facebook 7 Secrets to Getting More Plumbing Leads from Google AdWords How Much Does it Cost to Develop an Online Course? How to Advertise on Facebook How to Create a Webinar How to Create Online Courses 5 Ways Businesses Can Make a Good Facebook Ad 10 Instagram Marketing Tools for Growth Amazon Advertising Cost of Sales (ACOS) Facebook Lookalike Audiences ROAS Calculation Everything You Need for Opening a Beauty Salon Artificial Intelligence and SMS Marketing Team-Building Activities Your Digital Team Will Enjoy 4 Ways to Improve Your Facebook Marketing Strategy Can You Build a Business Today Without Social Media? Best Practices Aso App Store Optimization Kit CRM review How to define your media outlets and position your brand online What Do The Latest Algorithm Changes Mean For Facebook Marketers? 6 Lead Generation Ideas to Implement Immediately 7 Actionable E-commerce Marketing Techniques to Drive Sales Product Marketing Strategies every startup should adopt 10 Ways to Be More Productive Facebook Ads Manager vs. Business Manager: What’s the Difference? Facebook Ads Manager Guide Facebook Business Manager Guide How to Create a Facebook Business Page How Social Media Has Changed the Way Business Operates Don’t Make These 4 Branding Mistakes with Your Packaging Best Shopify Apps 2020 to Increase Sales Instantly [FREE APPS] The Unburnt: How to be Daenerys Targaryen of Content Marketing Facebook Interests List Start up Media Outlets Master Growth Marketing: 10 Best Principles How to use YouTube Live to develop your business Offer Custom Packaging Services with the Most Advanced Online Print Shop Software Conducting A Social Media Audit (+ Free Template) Facebook Carousel Ads: Hacks & Best Practices Facebook Playable Ads: What Are They? SEO vs PPC Saltability - Ann Brown Interview Social Media Audit Template E-Newsletter: Pros and Cons 5 Questions to Ask to Determine if Your Website is User-Friendly How Does Social Media Impact SEO Strategy? Magento Ecommerce SEO Checklist That Increase sales Top 5 reasons companies use content marketing to draw leads 7 In-Depth Techniques of Link Building How to Market Your Ecommerce Store Using YouTube Social Media Strategies To Improve Relationships With Your Audience Exceptional Tips for Creating More Effective Real Estate Ads Why You Shouldn't Ignore These Digital Marketing Metrics 6 Key Online Marketing Tools for Startups How To Increase E-mail Open Rates FB Groups Are In Such A Rage for E-Commerce Businesses: Why? How to Use Emotional Impact on Your Facebook Ads Top Advantages of Purchasing and Selling Products Online Generate More Leads by Utilizing Content Marketing Effectively Low-cost Digital Marketing Strategies for your business The Best eCommerce Business Exit Strategy – How To Cash Out In 2019 Legal Issues Most Startups Underestimate (Although They Shouldn't) CRACKING THE LOGO CODE – CREATING AMAZING LOGOS THAT MAKE AN IMPACT 21 Best Professional Employer Organizations in 2019 How to Choose the Best eCommerce Platform Print On Demand Create A Logo Importance of Marketing and Advertising on Billboards 6 Illustration Tricks Revealed by Web Design Experts Shipping Boxes for Ecommerce: The Ultimate Guide Must-Have Google Chrome Extensions for Marketing App Marketing Secret Revealed Live Chat Marketing Best Instagram Practices for Increasing Sales and Engagement Marketing Automation Tools How to Use Quizzes for Your Marketing Strategy How to retain focus when doing social media marketing for multiple clients Top 8 Tactics to a Winning Pre-Launch App Marketing Strategy Alternative Search Engines Best Instagram Tools to Boost Your Marketing Campaigns Best Cheap Web Hosting Personal Branding SWOT Analysis Facebook Search Amazon Product Descriptions Successful Shopify Stores What Is MOQ Meaning Do You Use Social Media Marketing With A Full Fledge? Online Business Ideas How Can Effective PPC Management Transform the Conversion Rate of a Business? What are the Best Features in Mobile Apps? How to Embed Your Instagram Photos and videos on the website? Website Builders Vs Ecommerce Stores - What's the Difference? Google Product Listing Ads 7 Landing Page Optimization Tweaks that Will Improve Your Conversion 7 Best and Free Photoshop Plugins for UI Designers Amazon Brand Registry Things to look for when choosing an outsourced CFO Optimize Your Online Services with Facebook Lead Ads How Social Commerce Platform TaggShop Monetizes Social Media Back to School Email Strategy How to Combine Facebook Ads with Email Marketing Strategy Best Ways to Get Feedback Social Media Marketing Ultimate Guide For Yelp Reviews How Cloud Computing Helps in the Field of Mobile App Development How To Read A Balance Sheet Affiliate Programs T-Shirt Templates The Bottom Line in the B2B Content Marketing Funnel Facebook Ad Metrics That Actually Matter 3 Types Of Business App Your Team Needs 7 Ways Busy Entrepreneurs Can Make Time for Important Projects Best Video Editing Software How to sell on Amazon CPA Marketing: The Ultimate Guide 7 Items to Add to a Marketing Team’s Meeting Agenda Top 7 Critical eCommerce Mistakes to Avoid When Selling Online Key Performance Indicators (KPI's) 5 Hacks Using Social Media to Get Free Popularity for Your Business Follow These Ecommerce Tips to Grow Your Online Store Burger King’s savage ideas of mocking its competitor Ready, Steady, Go: How to Achieve Your Goals in 50 Days Some Important Things to Note While Testing Salesforce 6 Highly Effective Tips For Email Marketing How to Improve Brand Awareness with Content Marketing? How To Write An eCommerce Business Plan Guest Blogging: Why it is a powerful inbound strategy? The importance of product launch marketing How to Encourage More Customer Reviews for your Ecommerce Business How to Use Facebook Ads in 2020 Without Going Broke Value Proposition Facebook Sponsored Story Facebook Pixel Events Facebook Instant Experiences How To Create A Website eCommerce Consumer Reviews: Your Secret Weapon to Skyrocket Your Conversions in 2019 The difference an unboxing experience can make to your brand 3 Sententious Brand Building Strategies From Instagram 5 Social Media Tools to Plan Your Content Content Marketing Advanced Facebook Automation with Revealbot 5 Most Advanced Facebook Advertising Techniques to Follow 10 unique products to sell with dropshipping 3 Reasons Your Small Business Could Benefit From Multi-Channel Marketing SaaS Trends Product Marketing Books Blog Vs. Website: What's Better for Your Business Digital Out of home advertising - what is it and different ways to do it How Any Construction Company Can Start Using Social Media to Grow Their Business 6 Holiday Marketing Ideas for E-commerce 3 Simple Steps to a Successful Product Launch How to Properly A/B Test on Facebook Why Sequential Facebook Ads Need A Plot To Succeed 5 Most Useful Digital Marketing Channels for eCommerce Facebook Marketing Mistakes We Should Avoid 5 Questions to Ask Any Internet Marketing Company Before You Hire Them Amazing SaaS Startup Growth Strategies You Shouldn't Miss Holiday Marketing - 12 Days of eCommerce Christmas SEO vs Social Media: Which Will Benefit Your Business Better? Fashion Tips: How To Match Accessories Designing an ecommerce cart abandonment email sequence that converts Best 2020 SEO Techniques With Great ROI Best Renovations that Will Increase Your Property Value for an Easy Sale What HR Needs to Prepare before Hiring a Nomad Blogger Role of Fractional CFO for Your Startup Top Email Marketing Software for E-Commerce Websites Visual Design for Social Media: Creativity in Focus 7 Ways to Boost your Facebook Lead Generation Strategy How to Allocate a Budget for Digital Marketing in 2020 Thanksgiving Email Subject Lines 5 Facebook Marketing Mistakes You Need to Stop Free Shipping Email Subject Lines 2023 Black Friday Email Subject Lines Valentines Day Email Subject Lines Fathers Day Email Subject Lines New Year Email Subject Lines New Arrivals Email Subject Lines Halloween Email Subject Lines Spring Sale Email Subject Lines Mothers Day Email Subject Lines Easter Email Subject Lines Cyber Monday Email Subject Lines Fall Season Email Subject Lines Labor Day Email Subject Lines Actionable eCommerce SEO Tips To Achieve Great Ranking Goals Interactive Marketing as a Way to Increase Interest to Your Business Website 4 Tips on How to Boost Your Search Engine Optimization Techniques Smart Ways to Promote Your Business on Twitter Getting Alone With The Essential Tips For Successful SMS Lead Generation Nametag: Newly Launched Instagram Marketing Features What Are The Financial Documents Required For Small Businesses? Your Final And Ultimate Guide To Instagram Influencer Marketing What Are The Problems You Face In A Business Venture? 6 Small Business Website Myths That Hinder Your Growth 10 Tips To Create A Smooth And User-friendly Ecommerce Store Comparison of Push notifications vs SMS vs Email marketing 5 SEO Benefits of Responsive Website Design Perceiving The Reasons That Cause Debts In Business And Handling Those Effectively 5 Things Why Visitors Hate Your Social Media Page What Are The Benefits Of Seo & Digital Marketing? The Magic of Giving Promotional Gifts for the Holidays 5 Ways That Your Business Benefits From Local SEO Services Why Adopting Pay Per Click Marketing Strategy Is Important To Your Business Top 5 Shopify Apps to Boost Sales Are You Monitoring What Your Kids Are Watching On YouTube? SEO - Beyond Making Online Content More Appealing To Search Engines Why do you need a Google SEO Expert Company in Singapore? The Top 4 Benefits You Will Enjoy When You Hire an SEO Company for Your Starting Business 7 Steps to Create An Impactful Marketing Strategy 10-point Checklist For Due Diligence For Sale Of Business Video Ads On Facebook: 4 Ideas To Help You Succeed How Is AI Reshaping Content Marketing? How to Create Viral Content on Instagram The Rise of SEO-Rich, Long-Form Content How To Properly Budget Your Time As A The Owner Of An Online Business A Guide to Creating Content for SEO Handling the Unexpected: How to Manage Sudden Business Growth How to Benefit from User-Generated Content How to Run A News Blog or Website Successfully? Some Key Do’s and Don'ts in Successful Personal Finance Management Facebook Marketing: Facebook Groups & Facebook Ads for Small Business Target Micro Influencers To Promote Your Business Marketing 3 Surprising Benefits Of Adopting An Inspection Software In Your Company How To Find A Job After College Graduation The 10 Commandments of Boosting Your Landing Page’s Conversion Rate Why should small businesses invest in SEO before traditional marketing hacks? Email Marketing: The Most Powerful Trends and Pitfalls Role of Logo Design in Marketing Strategy Customers Are Your Best Advertisers: Leverage Customer Feedback for Your Brand How to Win New Customers with Freebies How to Get Quality and Cost-Effective PSD to Magento Development 7 Reasons Why Email Marketing Calendar Is an Important Part of Your Business Campaign What are the Top Lies to Avoid about SEO! 10 Ways To Automate WordPress Tasks On Your Site 5 Tips for Boosting Your Social Media Marketing Pros and Cons of Marketing Automation How PPC and SEO Work Hand in Hand to Deliver Better Results? 8 Simple Ways To Build Your Personal Brand Top Trends That Will Drive Marketing and Sales How To Create An Unbeatable Facebook Ad Campaign How to Ignite Your Business with Twitter Chat 7 Ways to Dramatically Improve Your Content Marketing Building an SEO-Friendly Rebranding Strategy Top 10 Magento 2 Free Extensions Christmas Email Subject Lines Back To School Email Subject Lines Tips For Creating High Converting Call to Action Copy Summer Email Subject Lines Facebook Marketing Tips and Tricks 2023 The 3 Outperforming Traits of Great Digital Media Buyers April Fools Day Email Subject Lines Groundhog Day Email Subject Lines Canada Day Email Subject Lines Movember Email Subject Lines Green Monday Email Subject Lines Boxing Day Email Subject Lines Cart Abandonment Email Subject Lines Ecommerce Email Subject Lines 3 SaaS Companies Delivering a Seamless Brand Experience Through Blogging and How You Can Do The Same Revealbot: Leaning on Technology To Scale Our Facebook and Instagram Campaigns Amazon: Hitting 270K In Revenue From 49K Ad Spend 9 Minimalist Website Design Tips To Follow Right Now The (Often) Forgotten Art of Sales in Digital Marketing A Quick Intro to User Generated Content Why is a Landing Page Important in Social Media Marketing? DevOps as a Service - Is It Really a Good Idea for Your Business? The Power of Social: A No Brainer to Social media Lead Generation 5 Best Facebook Ad Campaigns to Boost Online Services Sales The Elements Of A Perfect Instagram Ad How To Use Instagram For B2B Lead Generation What Happens When Marketing and Programming Intersect Key features of any good User Interface design Ways to Increase Engagement on Social Media 10 SEO Techniques That Will Work For 2020 Can A Shopify Store Have Multiple Logins? 7 Horrible Mistakes You’re Making With Digital Marketing Use Animation Videos in your FB Ads to get over 50% Conversion Rates The Psychology of Retention Email Marketing Storytelling With Jarie Bolander From The Daily MBA White Hat SEO Provides Longer-Lasting Results when Compared to Black Hat SEO How Do You Make Your Home More Comfortable and Inviting? 4 Ways to earn links with content How Video Marketing Helps You Achieve Your Marketing Goals? The Secrets To Successful Small Business Press Release Writing How Your Marketing Efforts Can Improve Your Customer Service Experience How to Boost E-commerce Sale with Promotional Labels and Stickers What You Can Learn About Marketing from Baby Yoda and “Star Wars: The Mandalorian” Top 5 B2B eCommerce Scripts to Expand Your Business to B2B in 2020 Case Study of Turning a disastrous course launch into massive win The Most Successful eCommerce Platforms Voy Media Covid-19 Statement Best Email Marketing Benchmarks for This Year How to Run Email Marketing Campaigns During Summer How Coronavirus Is Impacting Ecommerce: The Good and Bad How Monday.com Uses Facebook Ads How ShaperMint Uses Facebook Ads How Territory Foods Uses Facebook Ads How to Become an Influencer Best Times To Post On Facebook How to Delete or Deactivate Your Instagram Account How to Post to Instagram from Your PC Work From Home Marketing Jobs How To Advertise on Snapchat How Much Does it Cost to Advertise on Instagram? How To Cross-Post To Instagram From A Facebook Page How to Make Money on Instagram How Much do YouTube Ads Cost? How to Make Money on Twitch How to Sell on Facebook Marketplace How to Calculate Profit Margin The Differences Between Marketing and Advertising Instagram Bio Ideas Facebook Carousel Ads: Hacks & Best Practices Voy Media Reviews Free Instagram Analytics Tools LinkedIn Headline Examples Top Instagram Models Social Media Icons Best Shopify Apps 2023 to Increase Sales Instantly [FREE APPS] Why consistency in your marketing agency is essential in your success? Google Ads Extension Does Google Ads Work Google Ads Quality Score How to Optimize Your Google Shopping Campaign How To Remove Powered By Shopify How To Get Paid on Instagram How To Create A Brand How to Come Up With a Business Name How To Price A Product In-House vs. Agency Marketing: What's Best For Your Business? Social Commerce Best Shopify Training Courses A Comprehensive Guide to Copywriting Courses A/B Testing Tools How To Persuade People Top B2B Content Trends For 2021 What Social Media Marketing Strategies A New Blogger Should Follow How to increase engagement on Facebook? 8 Proven Ways Financial Advisors Can Grow Their Business How Figuring out What Analytics to Be Tracking Is The Most Powerful Growth Tool for Your Mobile or Web App How to Launch Your Online Startup Right Now How to Choose a Niche Market (With Examples) Facebook App Install Ads [UPDATED] Ten Underrated Tricks That Boost Your Website Speed How to Successively Market Online Creative Ways to Make Your Website Stand Out Elements of a Great Company Culture How To Make An Infographic How to Buy a Domain Name How to Get on TikTok's For You Page (FYP) 8 Reasons Every Company Needs a Growth Manager Product Life Cycle Explained: What It Is, the 5 Stages, & Examples 10 Of The Funniest Digital Marketing Jokes That Will Make You Laugh What Is Guerilla Marketing Best Digital Marketing Podcasts How To Build a WordPress Website 3 Power Words That Boost Conversion Rates Boost Your Domain Authority Now: Checking and Improving This Key Site Metric How to Prioritize Your SEO Efforts What is a Subdomain and How Does it Affect Your Site’s SEO? Kylie Jenner's Marketing Strategy Is Dominating Ecommerce Why You Should Apply to a Startup Accelerator Y Combinator Accelerator Review How to Write a Video Script [Template + Video] What Are Agile Metrics? How To Make A QR Code How To Get Into Real Estate How To Write An Email Ebook Ad Examples How To Write Ebooks and Make Money What Is Creative Copywriting What Is Freelance Copywriting Is It Safe To Order From Facebook Ads? Google Marketing Automation What Does The Term Viral Marketing Mean? Amazon Trends Search Terms on Amazon How To Make A Poll On Facebook How to Find a Mentor - Tips and Strategies Google Secrets Google Analytics 4 An In-Depth Guide The 4 Ps of Marketing: What You Need to Know (With Examples) How To Get Followers on Twitter Productized Service Productized Service Examples Multilevel Marketing Vs Pyramid Scheme What Is Marketing All About How To Project Roi For Digital Marketing How To Measure Ecommerce Success How Effective Is Ecommerce In South Africa How Much Should A Small Business Spend On Marketing How To Make Marketing Flyers What Is The First Step In The Marketing Research Process? Marketing vs Advertising vs Branding Postcard for Real Estate Marketing How Does Inbound Marketing Work Marketing Strategy for Bakery Business Car Wash Marketing Strategies Dell's Marketing Strategy How Warby Parker’s Marketing Strategy Fueled Its 7+ Billion Valuation Funeral Home Marketing Strategy Oreo Marketing Strategy Home Depot Marketing Strategy Why Is Goal Setting Important To Inbound Marketing Marketing Plan For A New Product How Fast Can You Make Money With Affiliate Marketing What Does Evergreen Mean In Marketing Alternatives to Yahoo Groups Can I Have 2 Instagram Accounts How To Market To Senior Citizens NBA Marketing Strategy Converse Marketing Strategy: A Comprehensive Guide REI Marketing Strategy: Building a Sustainable Brand How Long Can You Go Live On Instagram? How To Advanced Search Twitter How To Turn Off Likes On Facebook How To Find Liked Videos On Facebook What Is Upselling? Upselling Definition and Examples Email Marketing Consulting How Colors Affect Conversions Home Depot Marketing Strategy How to Start an Advertising Agency (and Make $900K/Year) How Much Is My URL Worth? How to Start a Bank: The Complete Guide (2023) How To Get Cleaning Contracts How to Start an Advertising Agency (and Make $900K/Year) How Much Is My URL Worth? How to Start a Bank: The Complete Guide (2023) Funeral Home Marketing Strategy Email Marketing Consulting How to Start a $500K/Month Cleaning Business EIN Lookup How to Start a $500K/Month Car Detailing Business (2023) Marketing Examples of Scarcity Marketing Examples of Black Marketing Examples of Classical Conditioning Marketing with an English Degree Marketing with a Psychology Degree: How Understanding Human Behavior Can Improve Marketing Efforts Marketing with QR Codes: Understanding the Benefits and Best Practices Marketing with Data Analytics: The Importance of Data-Driven Decision Making Generation Alpha (Who is) and Why Are They Important to Marketers? Online Customer Research The Complete Guide Open Graph Meta Tags for Facebook and Twitter SMS Marketing Doesn't Suck: Here's How to Use it To Generate Revenue Facebook Hacks: Prevention Tips & Strategies Facebook Metrics Every Brand Needs To Track For Success How To Add Admin To Instagram How To A/B Test Facebook Ads Facebook Marketing Ideas Facebook Ads News: Latest Updates and Insights Facebook Customer Service Number How Many Facebook Users: Unveiling Facebook Statistics: Insights for Marketers How To Write Compliant Facebook Ad Copy That Converts Top 10 Content Marketing Mistakes to Avoid: What You Are Doing Wrong 7 Reasons Why Keyword Research Is Important for SEO Hertz Marketing Strategy: A Comprehensive Analysis of Hertz's Marketing Strategy and Overview Starbucks Marketing Strategy: Brewed for Success Apple Marketing Strategy Amazon Marketing Strategy Coca Cola Marketing Strategy B2B SaaS SEO: 7-Step Guide to Win in 2023 Marketing Automation to Drive Revenues Best MacBook Tools for Your Business Red Bull Marketing Strategy: Energizing Success through Innovation and Lifestyle Branding Netflix Marketing Strategy: Disrupting the Entertainment Industry with Innovation and Personalization The Value of Marketing Agencies: Why Investing in Them Can Transform Your Business McDonald's Marketing Strategy: A Recipe for Success Burger King Marketing Strategy: Flame-Broiling Success Exxon Mobil Marketing Strategy: Fuelling Success Boeing Marketing Strategy: Reaching New Heights McKesson Marketing Strategy: Driving Success in the Healthcare Industry What Can You Learn from the Gaming Industry about Marketing? AmerisourceBergen Marketing Strategy Berkshire Hathaway Marketing Strategy General Motors Marketing Strategy How to Run a Successful Social Media Campaign Top 5 Use Cases Of Airtable For Marketing Walt Disney Marketing Strategy: Driving the Magic of Brand Success Intel Marketing Strategy: Driving Technological Advancement Best Saas Marketing Strategies to Grow Faster How to Choose Domains for SEO Link Building? How Much Should You Pay Someone To Manage Facebook Ads? Should I hire A Facebook Ads Agency? What Is The Cheapest Facebook Ad Agency? How Do I Add An Agency To Facebook Ads? What Does A Facebook Ads Agency Do? When Did Social Media Become Popular Questions To Ask When Creating A Logo What Is Out Of Home Advertising What Are Freebies? What Is A Brand Story Content Optimization for SEO: Strategies to Improve Visibility and Rankings Unlock the Power of Web Design: 10 Secrets to Hiring the Perfect Designer The Green Revolution in Your Home: Unveiling the Power of Energy-Efficient Windows The Power of Gamification in Mobile Apps: Engaging and Retaining Users 3 Advantages of SEO That Proves Why Startups Need to Invest In It Cardinal Health Marketing Strategy Why You Should Add Subtitles To Your Instagram Videos Instagram SEO: Comprehensive Guide to Attain Success 7 Shortcuts to Monitor Competitors and Always Stay Ahead of the Game Call Tracking 101: Understanding What It Is and How It Works 3 Basic Ways to Rank Your Ecommerce Website in Search Engine Pages Twitter vs Facebook Threads: What Industry Experts Say? How To Optimize Your Resume To 'Beat The Bots' 7 Simple Tips to Keep Up With Google Algorithm Updates and Handle Them Like a Pro Humana Marketing Strategy: A Deep Dive into Humana's Effective Marketing Strategy PepsiCo Marketing Strategy: PepsiCo's Dynamic Marketing Strategy Revealed State Farm Insurance Marketing Strategy 5 Ways AI Will Shape the Graphic Design Industry in 2024 The Future of Education Marketing: Trends and Predictions by Professionals How to Measure SEO Success: 6 Tips to Evaluate Your SEO Performance Emerging Trends in Paid Social Media Advertising for 2024 Top Online Career Opportunities For Students After Graduation Direct Advertising: The Human Touch vs Programmatic Precision - Which Wins the Ad Game? 5 Game-Changing Digital Marketing Trends for 2024 and Beyond Beginner's Handbook to Content Writing Careers Why Do Professionals From Different Industries Use Mobile Proxies? Detecting AI-written Content Gaming on the Go: The Role of Swift Transactions in Industry growth The Secrets to Marketing in the Gaming Industry How to choose UX design agency: main responsibilities and skills Tax Compliance Made Easy: Mac OS Tools for Small Businesses 7 Marketing Tools Marketers Must Explore for Better Efficiency Pros and Cons of Hiring a Professional Blog Writer Crafting a Winning Social Media Strategy for SaaS Startups Top 5 Must-Read Marketing Books Every Student Should Explore for In-Depth Knowledge Online Reputation Management for Tax Businesses: Building Trust and Credibility AWS Consulting Strategies for Growing Businesses How Business Consultants Drive Positive Change Education Promotion: How Digital Collaboration with Influencers Can Benefit Both Parties Maximizing Digital Marketing Efficiency with Mac Tools for Enhanced Creativity and Productivity Trending Now: Top Trends in Web Push Notifications for 2024 The Importance of SEO in Digital Marketing: Enhancing Visibility and Driving Traffic 7 Email Marketing Strategies for Genuine Engagement Beyond Sales Has your social media account been hacked? We have 5 tips on how to recover it Best Shopify Marketing Strategies to Increase Your Sales Navigating the Odds: Effective Marketing Strategies for the Gambling Industry 12 Innovative Marketing Strategies That Transformed Dating Sites into Community Hubs Efficient Communication: The Importance of German to English Video Translation in Business Advantages And Disadvantages Of Online Classes The Impact of AI in Video Gaming What Should Be The Logo In 2024 A Basic Guide to Social Media Marketing Boosting E-commerce Efficiency: Leveraging Liferay Commerce for Growth Plays on Spotify is What Determines Your Success From Concept to Implementation: The Role of Database Management and Consulting Services Navigating the Digital Age with Insights From a Cybersecurity Expert Best Email Marketing Strategy for Educational Institutions in 2024 Navigating the intersection of blockchain technology and digital advertising Vanessa Selbst: The Poker Prodigy Who Changed the Game Finding Your Bullseye: How to Choose the Right Marketing Channels for Your Business Leveraging Facebook Ads for No Deposit Bonuses in Online Platforms The Future of Digital Marketing: Navigating Trends and Technologies for Effective Campaigns The Importance of Explainer Videos in Your Marketing Strategy How Telecom Software Solutions are Transforming Marketing Strategies 6 Tips For Better B2B Networking The Impact of Billing Software Development on Small Business Growth and Success 7 Things to Consider on the First Year of Running Your Business in NJ Tech Trends in Textiles: Innovations in Print on Demand Services New Age of Tech Changes Work and Play The Future of Digital Marketing in Event Management Top 7 Email & Digital Marketing Agencies with 4.5+ Ratings Tech Startups: Driving Innovation in the Digital Age Driving Excellence: How LLC Formation Empowers Digital Marketers to Cut Personal Costs and Thrive Are AI trading bots real? 15 Crucial Cybersecurity Pointers for Small Companies Why Should Students Look For a Job in Marketing, What Are the Pros and Cons? Leveraging the Power of IT Outsourcing for Enhanced Agility, Innovation, and Growth in the Tech Realm Monetizing Your Passion: Strategies for Internet Radio Broadcasters Geofencing Marketing Tips for Small Businesses Tips and Considerations for Choosing Power BI Consulting Services 4 Marketing Strategies Borrowed from the Gaming Industry Independent Escorts vs. Escort Agencies in Dubai: What's Better? Maximizing Your American Express Card Benefits How Can the Kanban Framework Help Your Marketing Projects? Small Business 101: How to Create and Implement a Marketing Plan on a Budget Maximising Ad Reach: How VPNs Revolutionise Geo-Targeted Advertising on Social Media Web Scraping for Market Research: Best Methods for Success The Importance of Consistency in SaaS Content Marketing What VPS to choose for your shop? The Future of Newspaper Advertising in 2024 A Comprehensive SEO SWOT Analysis Customizing Your Intranet Platform for Enhanced User Experience Blueprint for Success: The Art of Mockups How to Deal with Career Stagnation: Strategies for Moving Forward Enhancing User Engagement Through Intelligent Conversation Analysis Leveraging Link Exchanges for Enhanced Ad Campaigns Ad Agencies in London Ontario Digital Marketing Companies in Toronto List of Detective Movies Solving Criminals with a Phone Tracker Exploring Online Entertainment: Casinos and Sports Betting Clarifying Onboarding: Definitions and Directions for Modern HR View Instagram Without Detection: How To Browse Anonymously The Role of Interactive Video Ads in Digital Marketing Success Maximizing Marketing ROI: 6 Innovative Strategies from Industry Leaders 5 Best Link Building Services in 2024: What Company to Choose? The Importance of Seamless Support and How to Provide It to Your Customers Keyword Research Mistakes to Avoid in SEO Maximize Your SaaS Success with Content Marketing Dofollow Links: The SEO Lifeline in Digital Connectivity The Psychology of Visual Storytelling: Crafting Ad Creatives that Captivate and Convert Customizing Salesforce CPQ for Your Business Needs The Most Important Goals of Successful Advertising for Digital Businesses Celebrate This Memorial Day with Free Online Photo Editing The Ultimate Guide to Targeting the Right Audience on Facebook: Tips and Strategies Reasons to Outsource Your IT Support This Year How to Boost Sales with a Product Catalog Industry Insider Tips: How to Make Your Social Media Campaigns Stand Out The Future of No Deposit Casino Bonuses: Trends to Watch in the Online Gambling Industry The Art of Writing Compelling Copy for Ads and Landing Pages The Pros and Cons of Different BaaS Providers How to Evaluate the Financial Strength of Annuity Providers Mobile Proxies Explained: Definition, Use Cases, and Providers Why is AI Frowned Upon? The Role of Site Architecture in SEO The Proxy Paradox: Balancing Security and Accessibility in the Digital Age How To Go From Insight To Action Using Dispatch Analytics For FSM Operations Maximizing Local PPC Campaigns for Service Providers Unlocking Success: Marketing Strategies for Global Online Casinos Where to Buy Instagram Followers: A Guide to the Best Online Providers Top 8 Real Estate Software Development Companies Best Accounting Software for Small Businesses Ensuring Quality and Reliability in Medical Device Software Development Harnessing Marketing Data - Insights from a Leading Data Broker SEO Success for Real Estate Agents: Unlock Your Market Potential Exploring the Benefits of VPNs for Businesses in a Digital Age Learning from Non-UK Casinos to Enhance Marketing in Other Industries Role of Marketing in Promoting Responsible Gaming What Are Minimum Deposit Requirements at Digital Casinos? Cybersecurity 101 for Email Marketers: Protect Your Campaigns 7 Best Practices in Invoicing and Billing That Small Business Owners Should Adopt ASAP Future of Authentication: How eSignatures are Redefining Digital Trust The Safest Payment Methods for Online Gambling UK LinkPay.io review: the next-generation virtual card service Instantly.ai Review SMTP Ghost Review Mailshake Review Mailreach Review Salesforge AI Review How to Find the Best Secure Link Shorteners Online SOL vs AVAX: What to Invest In? Enhancing User Experience in Commercial Mortgage Platforms with Chatbots The Role of Content Marketing in Promoting International Online Casinos What you need to know if you want to open your own medical clinic 5 Key Social Media Trends to Follow in 2024 A Strategic Approach to Implement Marketing Automation The Importance of Seeking Medical Attention After a Truck Accident Understanding the Importance of User Intent in SEO The Relationship between Crypto and Social Media: What You Should Know Top Demand Generation Channels for Modern Marketers Quickmail Review Lemlist Review Apollo Review Reply.io Review How to Choose the Right Social Media Video Production Company Snov.io Review Salesloft Review Supersend Review How digital transformation is revolutionizing the insurance industry Klenty Review Nureply Review Close Review Breakcold Review Evaboot Review Building Trust and Credibility Through Strategic Content Marketing 3D Rendering 2025 - Emphasize the Unique Features of a Product Finding Great Sources for Sports Betting Tips and Picks Buy Soundcloud Plays Outreach Review Hunter Review Waalaxy Review How to Choose the Best Digital Marketing Agency: Expert Tips and Considerations Security and Reliability in LTC Dice: How to Choose a Safe Platform Walmart Marketing Strategy UnitedHealth Group Marketing Strategy CVS Marketing Strategy Protecting Little Faces: 5 Essential Skin Care Tips for Kids How To Choose Vanilla Perfume Online How Cloud Computing Enhances Business Flexibility The Role of Hospital Asset Tracking Software in Compliance Key Features to Include in a Successful Telehealth Applications The Evolution of Casino Marketing Strategies Chevron Marketing Strategy Costco Wholesale Marketing Strategy A Beginner’s Guide to WordPress LMS: Tips and Tricks 9 Best AI for Students in 2024 to Crush Your Next Math Test Microsoft Marketing Strategy Cigna Marketing Strategy Marathon Petroleum Marketing Strategy Integration of External Reviews Can Elevate E-Commerce Marketing Crypto communities’ most used social media platforms Innovative Exhibition Stand Ideas to Elevate Your Brand Presence Getting Started With an Effective Legal Marketing Plan How Plumbers Can Improve Their Websites to Get More Customers Facebook Ad Creative Testing Framework How Continuous Integration Streamlines Software Development Cellulite and Loose Skin on Thighs: Effective Solutions and Treatments Why Every Reseller Needs a Crosslisting App to Stay Competitive B2B Marketing: The Ultimate Guide to Driving Business Growth in 2024 How to Find Guest Posting Sites: A Quick Guide Profitable Wholesale Items to Consider Stocking Optimizing for Hyperlocal Search: Capturing Traffic from Your Immediate Area A Simple Guide on Registered Agent Services: The Whats and Hows Influencer and Content Marketing in Gaming: Lessons from Diablo 4's Success Achieving First-Page Rankings: Expert SEO Promotion Tips Creating a Personal Statement for Digital Marketing and Online Advertising Careers Tapping into the Potential: Why Forex Needs a Stronger Presence in Facebook Advertising A Guide to Visiting the Molokini Crater Boosting Restaurant Revenue: Integrating Online Ordering Systems Entertainment Beyond the Arena: Creative WWE Fan Experiences How Blockchain is Revolutionizing Cross-Border Payments in Fintech Why You Should Automate Everyday Business Tasks How to Optimize NAP for Local SEO? Why Migrating from HubSpot to Salesforce Can Improve Your Sales Pipeline Understanding the Role of Adaptogens in Stress Relief What is Cucumber Framework? Embracing with Test Automation How to Manage Inventory Accounting for Your eCommerce Store MoneyGram Payment System Overview Never Hit a Creative Wall Again: 7 Social Media Content Tricks For Inspiration Offshore Software Development: Everything you need to know Web 3.0 continues to make its way in digital marketing Integrating AI into Marketing for Better Results White Label Link Building: An Essential Guide for Agencies to Enhance Client SEO Why Video Marketing is Taking Over How The Gambling Industry is Integrating AI Exploring UK Museums for Art Enthusiasts Why Ethical Link Building Is Crucial for Long-Term SEO Success Marketing Strategies for Food and Beverage Distributors to Build a Successful Distribution Business How Can I Design My Own Logo? A Beginner’s Guide How Professional SEO Management Can Drive Business Growth How Smaller Audiences Can Provide Higher Engagement Rates The Rise of Generative AI in Marketing Print on Demand Trends: 10 Exciting Products to Know Developing Smarter Systems with Computer Vision Enhance Marketing Efficiency with Integrated, Trackable Direct Mail Solutions Best Practices for Managing Inventory in Your Online Store Leveraging Micro-Influencers for Authentic Brand Engagement: Strategies for Success How to Choose the Right Certification Management Software Optimizing Video Ads for Better ROI for E-commerce Stores Essential Features of Employee Reward Software for Business Growth How Custom Merch and Printing Solutions Can Enhance Your Brand’s Visibility How to Create Multiple Facebook Ads Accounts without a Phone Number? How to Build a Successful Podcast with Video Content How Community Engagement Drives Brand Loyalty and Enhances Marketing Efforts How AI Reel Generators Help Creators Monetize Their Content Faster Staffing Agency in Anchorage: Supporting Alaska’s Workforce Needs Outsourcing Key Tasks for a Thriving Amazon Business Living and Working in New Zealand: A Guide to Embracing a Balanced Lifestyle The Pros and Cons of Using Amazon Repricing Software Personalization Strategies in B2B Email Campaigns What is Crypto Marketing: Understanding the Fundamentals of Crypto Marketing Cryptocurrency Marketing 101: A Beginner's Guide Understanding the Target Audience for Cryptocurrency Marketing Top 15 Best Crypto Marketing Strategies for 2025 The Future of Higher Education – What Role Cambridge Should Play in Leading Academic Reform Clorox Marketing Strategy Leadership Quotes Sample Size Calculator Qualtrics Survey Customer Journey Map What Does Dei Stand For Net Promoter Score Kano Model Free Survey Maker Hybrid Work Meaning Voice Of The Customer Market Intelligence Digital Marketing Trends Marketing Webinars Programmatic Advertising How To Use Hashtags Diploma In Digital Marketing Ai Digital Marketing Social Responsibility Examples Programmatic Alternatives To Facebook Content Creation Tools Importance Of Seo How To Get Famous On Youtube What Is A Retail Media Network Engagement Bait What Is Rich Media How Much Is Tiktok Advertising How Much Does Tiktok Advertising Cost How Effective Is Tiktok Advertising Tiktok Advertising Strategies Tiktok Advertising For Small Business Why Personalizing Employee Recognition Matters in 2025 Betting and Gambling Ads on Facebook Gambling Marketing Strategies How To Check A Website’s Traffic Alibaba Marketing Strategy EBay Marketing Strategy JD.com Marketing Strategy Zalando Marketing Strategy Etsy Marketing Strategy Wayfair Marketing Strategy Flipkart Marketing Strategy Wish Marketing Strategy AliExpress Marketing Strategy Myntra Marketing Strategy Coupang Marketing Strategy Pinduoduo Marketing Strategy Lenskart Marketing Strategy Ocado Marketing Strategy The Role of Social Media in Brand Building in 2025 Leveraging GPS Fleet Tracking for Enhanced E-Commerce Delivery Future-Proofing Enterprises with Tailored AI Strategy Consulting Rakuten Marketing Strategy Shopify Marketing Strategy ASOS Marketing Strategy Lazada Marketing Strategy Boohoo Marketing Strategy Farfetch Marketing Strategy Chewy Marketing Strategy Zappos Marketing Strategy Newegg Marketing Strategy Carvana Marketing Strategy Redbubble Marketing Strategy StockX Marketing Strategy The Science of Storytelling in Advertising: How to Engage and Sell ThredUp Marketing Strategy Moda Operandi Marketing Strategy OpenTable Marketing Strategy Blue Apron Marketing Strategy HelloFresh Marketing Strategy Casper Marketing Strategy Warby Parker Marketing Strategy Glossier Marketing Strategy Allbirds Marketing Strategy Stitch Fix Marketing Strategy Bonobos Marketing Strategy Revolve Marketing Strategy Vinted Marketing Strategy Depop Marketing Strategy The Hut Group Marketing Strategy Macy’s Marketing Strategy Best Buy Marketing Strategy Target Marketing Strategy Salesforce Marketing Strategy Adobe Marketing Strategy SAP Marketing Strategy Oracle Marketing Strategy ServiceNow Marketing Strategy Workday Marketing Strategy Atlassian Marketing Strategy Slack Marketing Strategy Zoom Video Communications Marketing Strategy HubSpot Marketing Strategy Dropbox Marketing Strategy Box Marketing Strategy DocuSign Marketing Strategy Twilio Marketing Strategy Snowflake Marketing Strategy Datadog Marketing Strategy Splunk Marketing Strategy Coupa Software Marketing Strategy Okta Marketing Strategy Zendesk Marketing Strategy Freshworks Marketing Strategy Asana Marketing Strategy Smartsheet Marketing Strategy GitLab Marketing Strategy GitHub Marketing Strategy SurveyMonkey Marketing Strategy InVision Marketing Strategy Calendly Marketing Strategy Monday.com Marketing Strategy Miro Marketing Strategy Airtable Marketing Strategy AI Companions on the Rise: Are Virtual Girlfriends the Future of Love? QuickBooks Online Marketing Strategy Xero Marketing Strategy Canva Marketing Strategy Gusto Marketing Strategy Procore Marketing Strategy Veeva Systems Marketing Strategy BlackLine Marketing Strategy Chargebee Marketing Strategy Zuora Marketing Strategy PagerDuty Marketing Strategy Sumo Logic Marketing Strategy Gainsight Marketing Strategy Intercom Marketing Strategy Pipedrive Marketing Strategy Marketo Marketing Strategy Square Marketing Strategy Real Madrid Marketing Strategy FC Barcelona Marketing Strategy Atletico Madrid Marketing Strategy Sevilla FC Marketing Strategy Manchester United Marketing Strategy Manchester City Marketing Strategy Liverpool FC Marketing Strategy Chelsea FC Marketing Strategy Arsenal FC Marketing Strategy Tottenham Hotspur Marketing Strategy Everton FC Marketing Strategy Juventus Marketing Strategy AC Milan Marketing Strategy Inter Milan Marketing Strategy AS Roma Marketing Strategy Napoli Marketing Strategy Paris Saint-Germain Marketing Strategy Olympique De Marseille Marketing Strategy AS Monaco Marketing Strategy Bayern Munich Marketing Strategy Borussia Dortmund Marketing Strategy RB Leipzig Marketing Strategy Bayer Leverkusen Marketing Strategy Ajax Amsterdam Marketing Strategy PSV Eindhoven Marketing Strategy Feyenoord Marketing Strategy Benfica Marketing Strategy FC Porto Marketing Strategy Sporting CP Marketing Strategy Celtic FC Marketing Strategy Rangers FC Marketing Strategy Zenit Saint Petersburg Marketing Strategy Shakhtar Donetsk Marketing Strategy Club Brugge Marketing Strategy Anderlecht Marketing Strategy Fenerbahçe Marketing Strategy Galatasaray Marketing Strategy Beşiktaş Marketing Strategy River Plate Marketing Strategy Boca Juniors Marketing Strategy Santos FC Marketing Strategy Flamengo Marketing Strategy Palmeiras Marketing Strategy Corinthians Marketing Strategy Cruz Azul Marketing Strategy Club América Marketing Strategy LA Galaxy Marketing Strategy New York City FC Marketing Strategy Seattle Sounders Marketing Strategy Toronto FC Marketing Strategy Future Trends in Digital Marketing: What to Expect in the Next Decade The Role of TikTok in Attracting Gamblers to Online Casinos Arizona Cardinals Marketing Strategy Atlanta Falcons Marketing Strategy Baltimore Ravens Marketing Strategy Buffalo Bills Marketing Strategy Carolina Panthers Marketing Strategy Chicago Bears Marketing Strategy Cincinnati Bengals Marketing Strategy Cleveland Browns Marketing Strategy Dallas Cowboys Marketing Strategy Denver Broncos Marketing Strategy Detroit Lions Marketing Strategy Green Bay Packers Marketing Strategy Houston Texans Marketing Strategy Indianapolis Colts Marketing Strategy Jacksonville Jaguars Marketing Strategy Kansas City Chiefs Marketing Strategy Las Vegas Raiders Marketing Strategy Los Angeles Chargers Marketing Strategy Los Angeles Rams Marketing Strategy Miami Dolphins Marketing Strategy Minnesota Vikings Marketing Strategy New England Patriots Marketing Strategy New Orleans Saints Marketing Strategy New York Giants Marketing Strategy New York Jets Marketing Strategy Philadelphia Eagles Marketing Strategy Pittsburgh Steelers Marketing Strategy San Francisco 49ers Marketing Strategy Seattle Seahawks Marketing Strategy Tampa Bay Buccaneers Marketing Strategy Tennessee Titans Marketing Strategy Washington Commanders Marketing Strategy Top Tips from Agency Shopify Experts for Creating an SEO-Friendly Store Why Mobile SEO Matters for Australian E-Commerce Stores What is the best way to layout an office? Outsourcing of IT Services. What Is It and How Does the Custom Development Process Work? Future-Proofing Your SEO Strategy with AI Innovations Exploring UK Museums for Art Enthusiasts How a Video Production Agency Can Maximise Your Marketing Budget The Digital Transformation of Healthcare: A Modern Healthcare Revolution Find Out How White Label Lead Generation Drives Higher ROI Shopify Enterprise vs. Standard Shopify: Which One Is Right for You? Best Strategies for iGaming | Win Big in 2025 Design Patterns in Android Development: When and How to Use Them If You’re an Email Marketer, Here’s What You Should Know About Phishing The Secret to the Most Successful Marketing Tactics of Canadian Online Casinos: A Study by CasinoRIX Experts Local SEO Strategies for Construction Firms: Becoming a Community Staple How SEO and Paid Ads Work Together to Maximize eCommerce Sales Maximising Solana’s Visibility with Facebook Ads: A Data-Driven Strategy The Impact of Link Building on Online Visibility Boost Your Revenue: The Power of SEO Reseller Services Explained Hootsuite Alternative Post Bridge Alternative Pallyy Alternative Planable Alternative Buffer Alternative Agorapulse Alternative Sendible Alternative Statusbrew Alternative Sprout Social Alternative ContentStudio Alternative EClincher Alternative Planoly Alternative Later Alternative CoSchedule Alternative Hootsuite Review Post Bridge Review Pallyy Review Planable Review Buffer Review Agorapulse Review Sendible Review Statusbrew Review Sprout Social Review ContentStudio Review EClincher Review Planoly Review Later Review CoSchedule Review Optimizing Lead Generation Strategies, As Per The Study By Jumpfactor The Future of PPC: Trends to Watch in 2025 Creating Health-Conscious Campaigns That Resonate with Today’s Consumers: Key Strategies & Insights Simplifying Event Planning: Birthday Party Bookings Made Easy for Event Organizers How Relationship Managers Can Bridge the Gap Between Clients and Teams Affiliate Marketing for E-Commerce: Is It Still Worth It in 2025? Preventive Maintenance Software: Reduce Downtime, Boost Performance Essential Startup Admin Hacks: Top Tools to Save Time and Money for Entrepreneurs Exploring Iowa’s Most Underrated Attractions OneClickDrive Brings Luxury to the Streets of Marrakech Through Supercar Rentals How Social Proof Enhances Trust in Online Casino Marketing The Complete Guide to Digital Employee Onboarding in 2025 The Tools That Made My Sales Follow-Ups Feel Effortless (and Effective) Systeme.io Review Rocketreach Review Deliverability Checks Is Yesware Safe Pitchbox Review Datanyze Review LeadFuze Review How Much Does Outreach Cost? Dripify Review Reachinbox Review Folderly Review Audienceful Review Woodpecker Review Smartlead Review Outreach Pricing Salesloft Pricing Instantly Pricing Dripify Pricing Instantly Ai Pricing Rocketreach Pricing Outreach Io Pricing Smartlead Pricing Mailshake Pricing Reply Io Pricing Meet Alfred Pricing Saleshandy Pricing Rocket Reach Pricing Seamless.ai Pricing Klenty Pricing Growbots Pricing Evaboot Pricing Outreach Voice Pricing Mailmeteor Pricing Expandi Pricing Sales Loft Pricing Overloop Pricing Marketo Engage Pricing Snov.io Pricing Instantly Email Pricing Egrabber Pricing Findymail Pricing Yamm Pricing Clay Pricing The Impact of a Good SEO Company on Lead Generation How Small Businesses Can Thrive With Smart Marketing Building a Responsive Email List: Tips and Tricks for Success Salesloft Pricing Per User Quickmail Pricing Lavender Ai Pricing Woodpecker Email Pricing Waalaxy Pricing Uptics Pricing Meetalfred Pricing Yet Another Mail Merge Pricing Aeroleads Pricing Amplemarket Pricing Snov Pricing Buzzstream Pricing Alfred Pricing Seamless Pricing Bardeen Pricing Anymail Finder Pricing Campaigner Pricing Leadgenius Pricing Lavender Pricing Hyperise Pricing Streak Pricing Pitchbox Pricing Gmelius Pricing Pipl Pricing Leadleaper Pricing Elastic Email Pricing Lead411 Pricing Anymailfinder Pricing Lemwarm Pricing Sales Engagement Pricing Adobe Marketo Pricing Salesmate Pricing Clay.com Pricing Snovio Pricing Leadfuze Pricing Sales Enablement Pricing Customer Io Pricing Mailmodo Pricing Canary Mail Pricing Exact Target Pricing Leadiq Pricing Apollo Leads Pricing Salesloft Pricing Reddit Apollo Pricing Plans Yesware Pricing Crystalknows Pricing Lusha Pricing Plans Zoominfo Individual Pricing Merge Pricing Rei Reply Pricing Lusha Pricing Engage Pricing Mailchimp Smtp Pricing Lead Generation Pricing Models Gmass Pricing Mixmax Pricing Persistiq Pricing Outreach Pricing Per Seat Piesync Pricing Apollo Pricing Unlimited Journalist Ai Review Outrank.so Review Jasper Ai Review Arvow Review Zimmwriter Review Koala Review Junia Writer Review Surfer Seo Review Seowriting.ai Review Writersonic Review Shortly Ai Review Scalenut Review Journalist Ai Alternative Outrank.so Alternative Jasper Ai Alternative Arvow Alternative Zimmwriter Alternative Koala Alternative Junia Writer Alternative Surfer Seo Alternative Seowriting.ai Alternative Writersonic Alternative Shortly Ai Alternative Scalenut Alternative Gathercontent Review Surferseo Alternative Wordtune Alternative Ryte Alternative Frase Alternative Copy.ai Alternative Speedwrite Alternative Word.ai Alternative Copy Ai Free Alternative Gather Content Alternative Free Copy Ai Alternative Alternative To Wordtune Copyai Alternative Wordai Free Alternative Speedwrite Alternative Free Anyword Alternative Rytr.me Alternative Shortlyai.com Alternative Auto Blogging Software Ai WriterThere is no doubt about it – with over 2.3 billion monthly active users worldwide, Facebook still remains the biggest social media site today. This makes the platform potentially effective not just for connecting with friends, but also for raising awareness about your brand through ads. Imagine being able to tell even just a fraction of Facebook’s users about what you’re selling. The response could be phenomenal.
In fact, Facebook users interested in buying are increasingly clicking on ads, with e-commerce click-through rates having tripled in the last two years. The social network also trumps other popular advertising media in terms of building brand awareness – it costs just .29 to make a thousand impressions with Facebook ads compared to and more with television commercials.
But just having the ads won’t get you the results you want. To ensure that your ads are working as intended, you need to analyze them while they’re running. And for this, you will need Facebook’s Ads Manager and its custom ad reports.
Ads Manager is a handy tool that gives you insights on your ad campaign’s performance. The reports provided are standard by default, but you can customize them to filter out information you don’t need and highlight the stats you do want to see. These custom ad reports are useful in identifying the changes or improvements needed to maximize the effectiveness of your campaign.
That said, here are steps to follow in creating custom reports and getting the most out of them:
1. Master the core metrics in ad analysis
How do you know your Facebook ads are performing? Marketers usually look at four metrics to gauge the performance of their campaign. These are:
-
Cost per result
Contrary to what its name implies, cost per result does not indicate the overall amount you spent on your campaign. Rather, it is the cost you spent to get the objective of your campaign that you optimized your ads for.
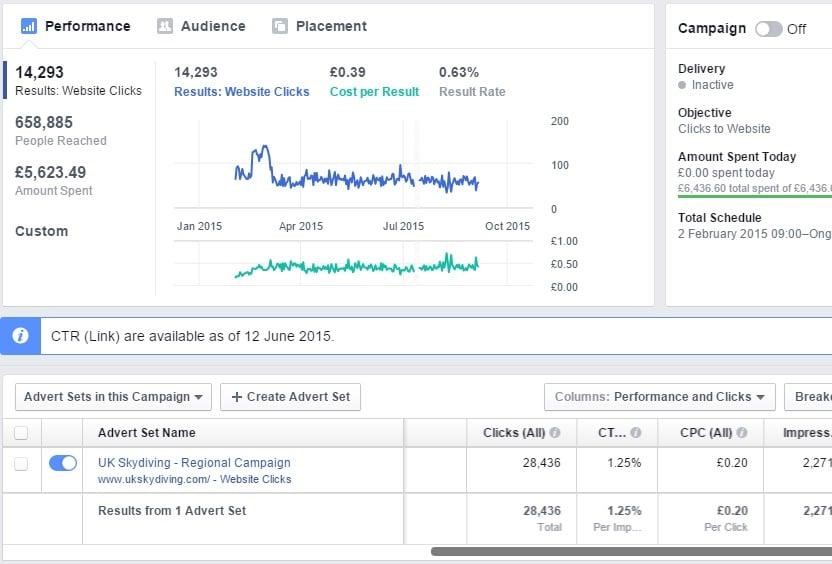
Image Credit: AdEspresso.com
In a conversion campaign, for instance, every purchase made through your site after the delivery of an ad could be set as a success. Cost per result is computed as your budget divided by the number of successful actions, so a decrease in this metric is interpreted as an increase in your campaign’s performance.
-
Relevance score
Facebook assigns your individual ads an estimated score from 1 to 10 depending on how they fit your audience. The scores tend to vary during the first 72 hours and stabilize as the campaign settles into the algorithm. A higher relevance score usually coincides with a low cost per result and is indicative of good campaign performance. By the way, Facebook tends to stop delivering ads with very low relevance scores, so this metric is very important.
-
Frequency
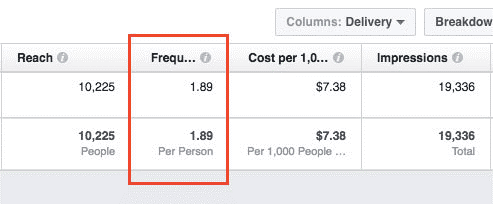
Image Credit: AdEspresso.com
This metric shows how many times your intended audience has seen your ads. It usually starts at 1 and begins to increase along with your spend. You need to watch out for the phenomenon called ad fatigue, which happens when people begin to get tired of seeing the same ad. This causes an increase in your cost per result and a decrease in your relevance scores. Conversely, even an improving campaign will show an increase in frequency, albeit in slower increments.
-
Cost per Mille (CPM)
This metric measures the cost of 1,000 impressions or your ads’ appearance on your target audience’s screens, making it a good determiner of your campaign’s visibility. Ad fatigue from high frequency tends to increase CPM, along with cost per result.
2. Set up your assets
Ads Manager allows you to manage your assets conveniently. How you plan and set up your assets will inevitably affect the performance of your campaign. Under the Assets tab in Ads Manager, you will find the following items:
-
Audience
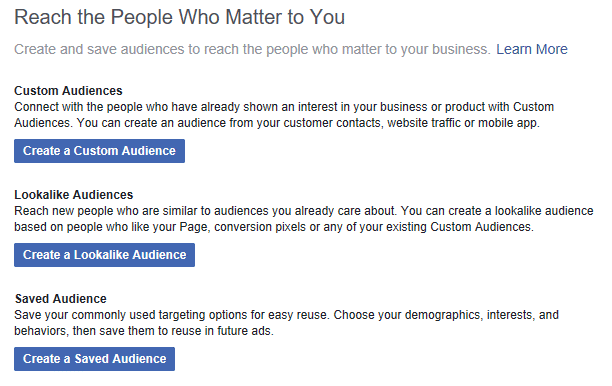
Image Credit: AdEspresso.com
This lets you assign audiences for your ad. You can create three types: Custom (people who have already visited your page or website), Lookalike (people who are similar to the people who have visited or liked your page), and Saved (people you have found using custom combinations of demographics, interests, and behaviors, among others).
-
Images
This is a repository of all the images you have uploaded to Ads Manager. You can choose to upload in bulk instead of uploading one by one.
-
Catalogs
This section is especially useful if you have an e-commerce site. It lets you view purchase events, product sets, and other relevant product data.
-
Business locations
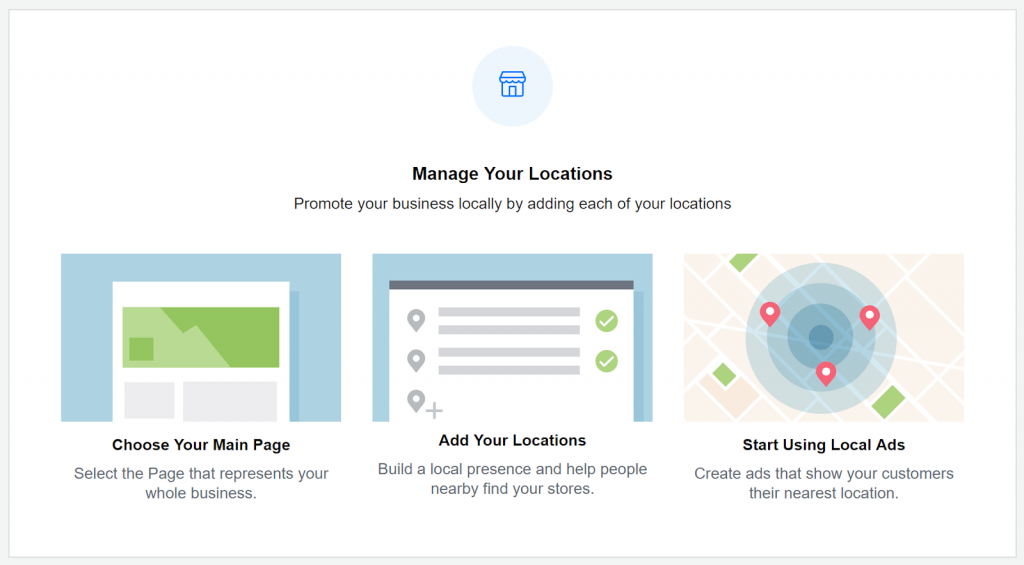
Image Credit: Easy AutoTagging.com
If you have stores or businesses in different locations, you can input the addresses here. This section is handy for when you want to customize the location of your ads.
-
Block lists
The block list allows you to prevent your ad from running in domains or apps you specify.
-
Video
The section is similar to Images, except it contains all the videos you have uploaded to Ads Manager over time.
3. Create your campaign in Ads Manager
In Facebook Business Manager, click the link to Ads Manager. From here, you can create your very own campaign by clicking the green button that says Create Ad. Next, follow these steps:
Step 1: Indicate a campaign objective
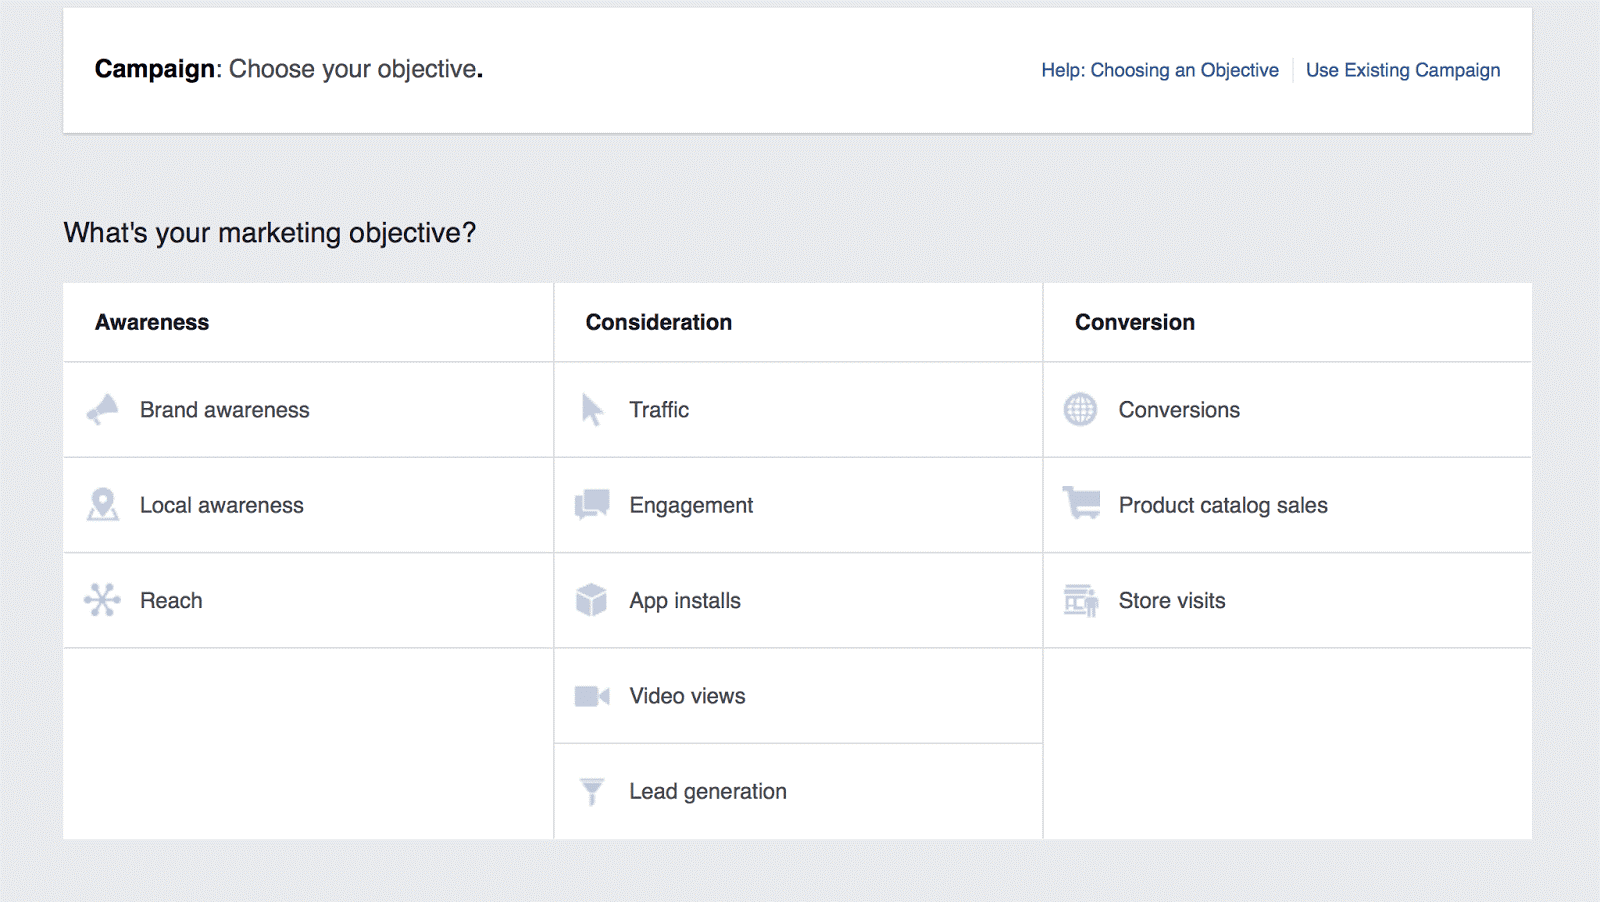
Image Credit: AdEspresso.com
You can choose from several preset objectives, which include Awareness, Reach, Engagements, Conversions, and others. Facebook helps optimize the delivery of your ads, among other benefits, depending on which objective you select.
Step 2: Name your campaign
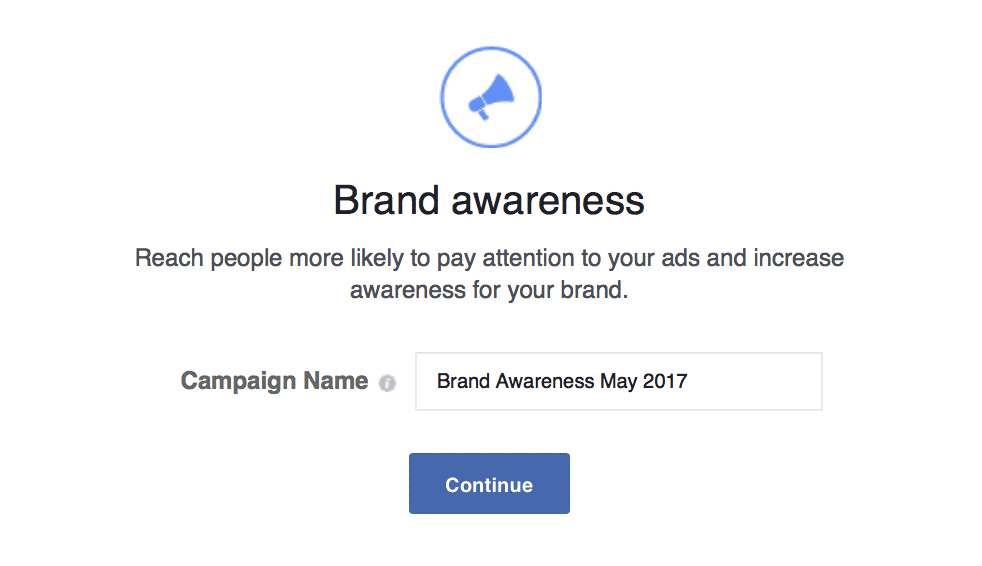
Image Credit: AdEspresso.com
This part is self-explanatory. A piece of advice: indicate the date range when naming your ad campaign. If you have multiple campaigns running, the date range will make looking for the right ads easier.
Step 3: Define audience targeting
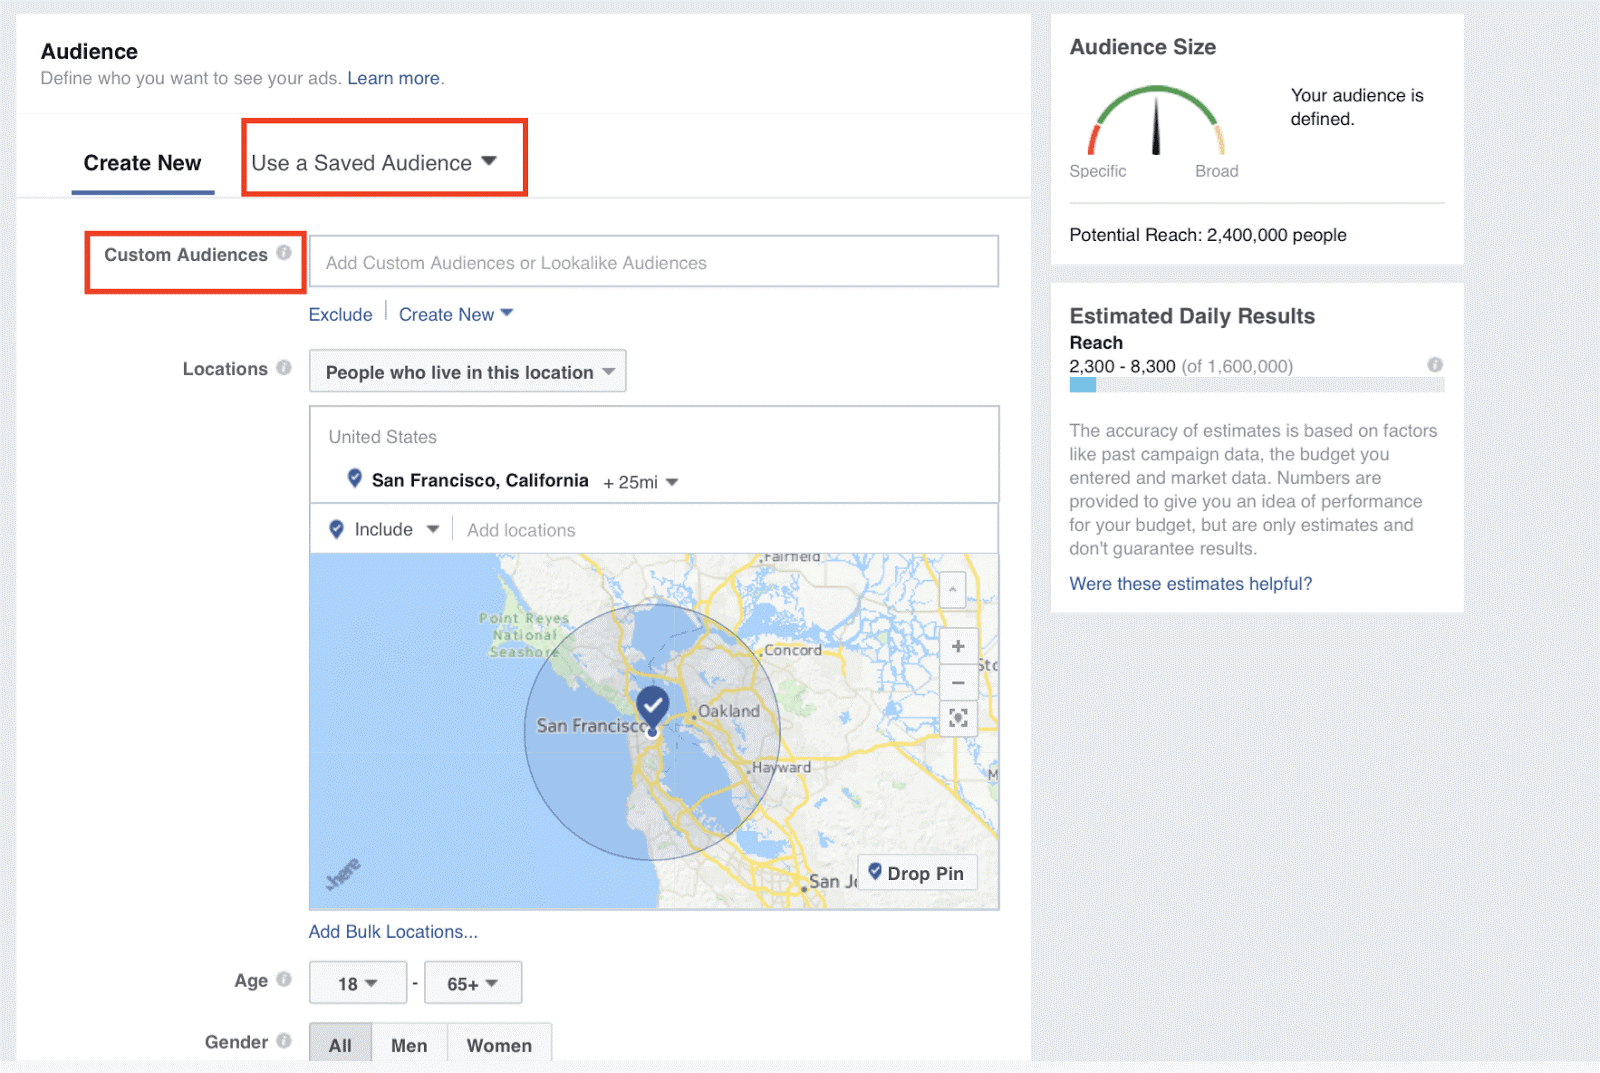
Image Credit: AdEspresso.com
Remember the Audience section discussed above? You can use any of the audience types you have created in this section.
Step 4: Define your ad placement
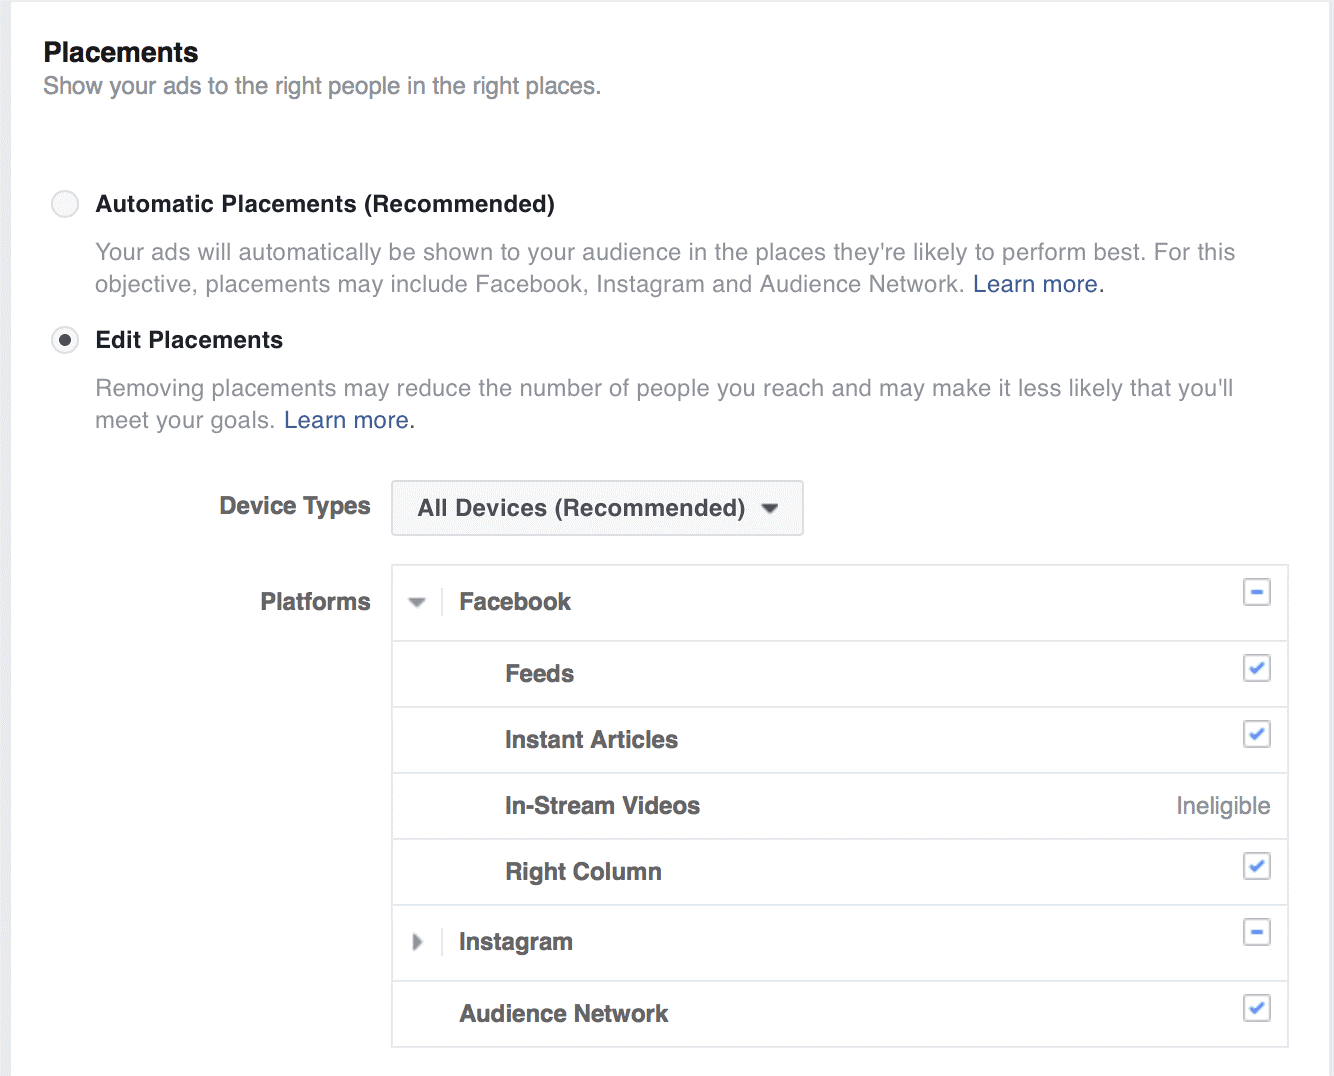
Image Credit: AdEspresso.com
This lets you choose where the ads will appear. You can opt to show the ads on all platforms and formats or just a select few of Facebook’s digital real estate. Needless to say, the number of placements will affect the final cost of the campaign.
Step 5: Define your budget and bidding
In this section, you decide how much you’re allotting for the campaign. There are several options you can use to ensure that you are not overspending on your campaign. This is also where you can bid against your competitors for the best placement and keywords.
Step 6: Construct the ad
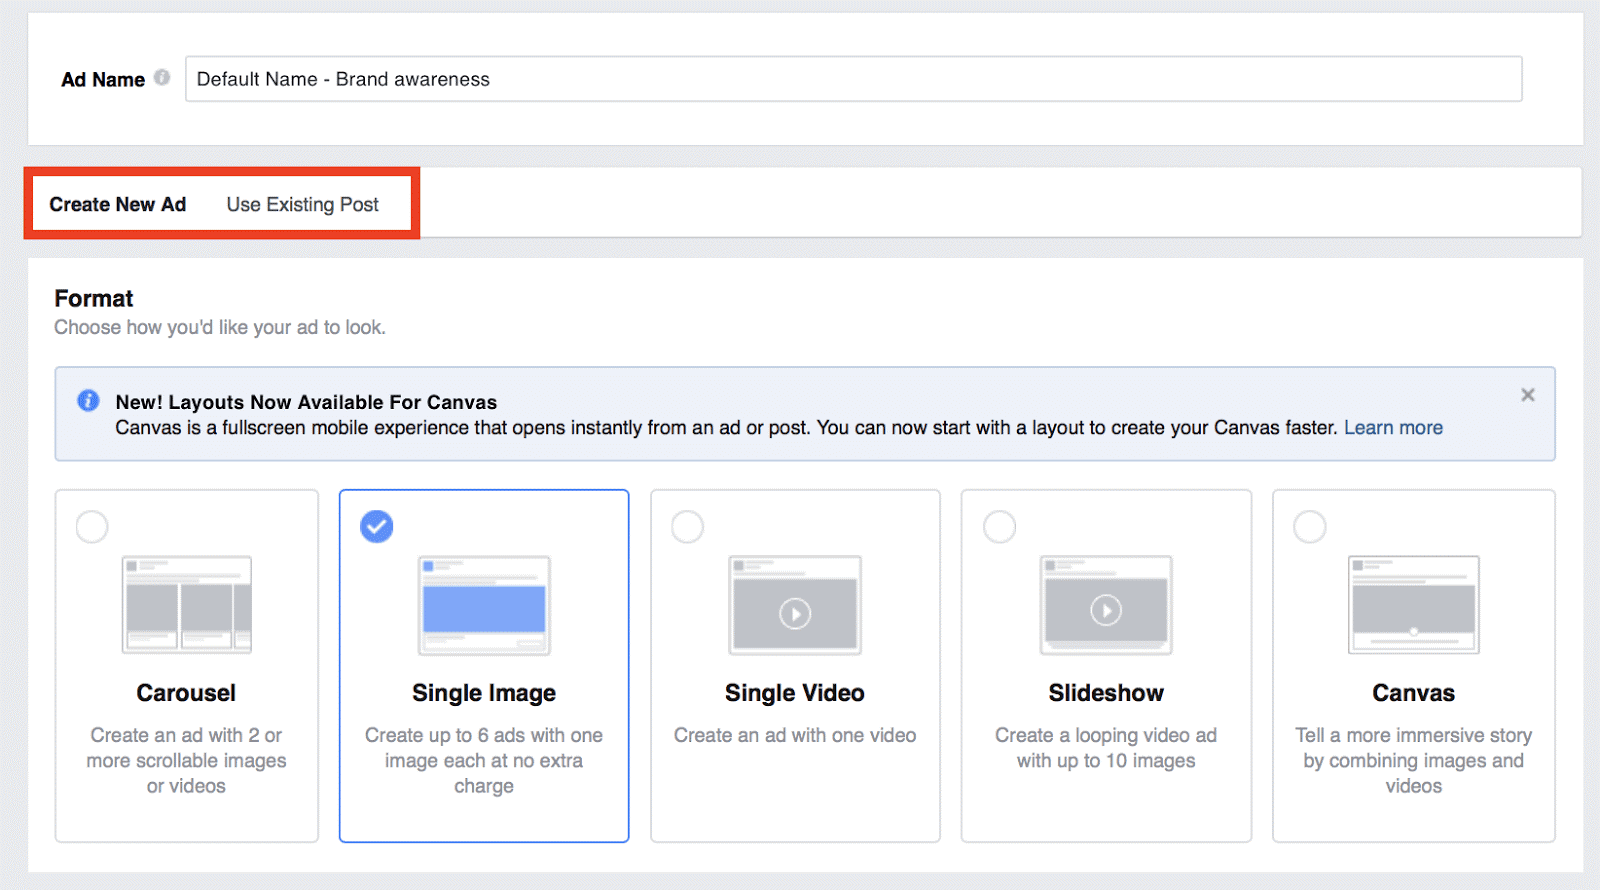
Image Credit: AdEspresso.com
This section lets you create the ad that will be shown to your audience. You can build new ads or select existing ones you’ve made in the past.
4. Use the right attribution window
Keeping track of what influenced your customer to buy your product is essential to creating successful campaigns. But if you’re using several advertising channels at the same time, attributing the successful action to the specific ad or marketing channel can be hard. Facebook’s attribution window can help you trace the conversion process, giving you a clear picture of the journey that customers took before making the purchase.
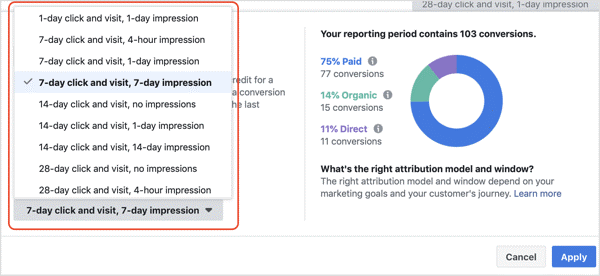
Image Credit: SocialMediaExaminer.com
There are several attribution models – how attribution is credited to which channel – to choose from. The same is true for attribution window, which pertains to the data recorded for actions attributed to your ads.
5. Measure and compare
Just looking at your campaign’s performance one day at a time may not give you a clear enough picture. Keeping track of the campaign’s progress day by day by comparing reports would be more effective for analysis.
Comparison reporting is easy to do in Ads Manager, as long as the campaign, ad, or ad set has run longer than one date range. To do it, just follow these steps:
Step 1: In Ads Manager, select the ad or campaign you want to view.
Step 2: In the top right, click on the date drop-down menu. This often shows the Last 30 Days by default.
Step 3: Go to the Compare icon and click it.
Step 4: Using the Calendar view, select the specific dates you want to compare.
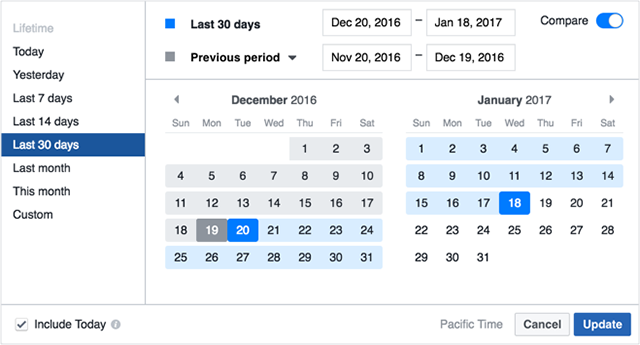
Image Credit: Facebook.com
Conclusion
Facebook ads are among the most effective ways for a business to increase brand awareness, engagements, and conversions today. And with custom ad reporting, it has become easier to keep track of the ads you’re running and ensure that your business is getting your expected returns.
What do you like most about custom ad reports? Tell us in the comments.
 Author’s Bio: Aaron Chichioco is a digital PR / business columnist. He has a vast experience in overseeing daily operations of several online businesses since 2011. He is currently the managing editor of designdoxa.com. You can follow Aaron on Twitter.